Sunday, June 7, 2020

Seaming Delights


"A man at work, making something which he feels will exist because he is working at it and wills it, is exercising the energies of his mind and soul as well as of his body. Memory and imagination help him as he works" Wm Morris


Once you've bedded an area of stone in mortar, then you turn your hands to filling the seams. It was well after thanksgiving 2018 when I finally reached the point when I felt that seam-filling of the stone terrace could begin. In fact, given how winter went that year, damp with long bouts of poor weather, and what with competing demands from involving decorating projects on the home front, it would be early spring before I actually got down to mortaring those seams. Reaching that point meant I'd stuck down enough stone in a consistent-enough design to feel comfortable closing it up - a process that makes the finished pavement spring to life by giving it its ultimate look. I was a bit flabbergasted finally to be switching modes, and painfully aware just how far there was to go. On one hand, I'd affirmatively answered the question of whether my aging body could put out enough energy to get the pad in place in embryo. But now I had to reach further down and find the added energy to embark on another phase of the work, one equally, if not more, demanding.


The job of sticking down stone had progressed quite steadily back in summer 2018, at least that is until we were hit with early fall rains, starting unexpectedly in late August. It certainly caught me by surprise. Rain is difficult at any stage of stone masonry, and I was moving way too fast to accommodate it at first. I was in 'production mode' at the time, having developed a rhythm in the inviting conditions of summer, so I made the mistake of trying to simply keep going despite the changing conditions. This passed muster in terms of raw output, but then at some point I realized that this working in wet conditions was wicking cement dust from my gloves and shoes, resulting in a misting of the placed stones by cement haze. Masked at first by wet weather, this became obvious as soon as the pad dried out again. I was appalled at my failure to recognize this while it was happening, the more so when it proved hard to clean off. In the end I simply resolved to slow down to accommodate the ambient conditions, ensuring no further inadvertent transfer of cement to stones - good recovery dude, with a gradual return to positive feeling as a result! At that point I continued sticking down stone on the inside edge of the terrace just as I began to work on filling seams at the completed outer edge. But very quickly winter imposed its long interregnum, other projects took over, and very little happened until spring's arrival intimated fresh possibilities.


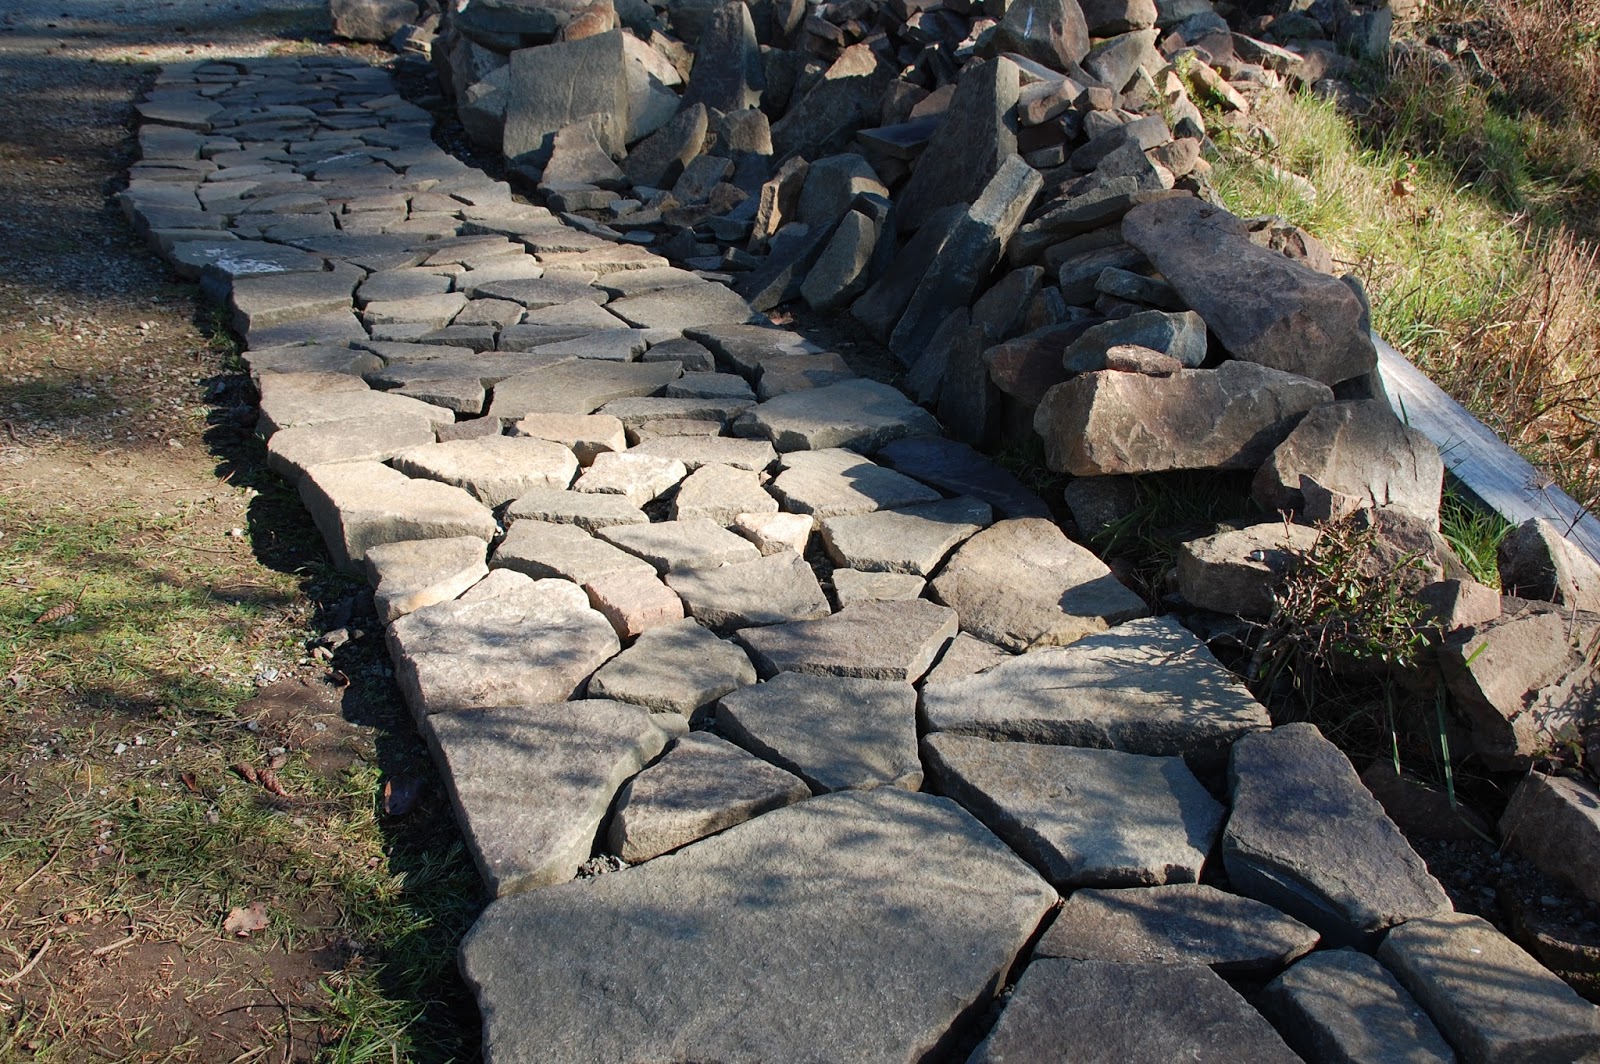
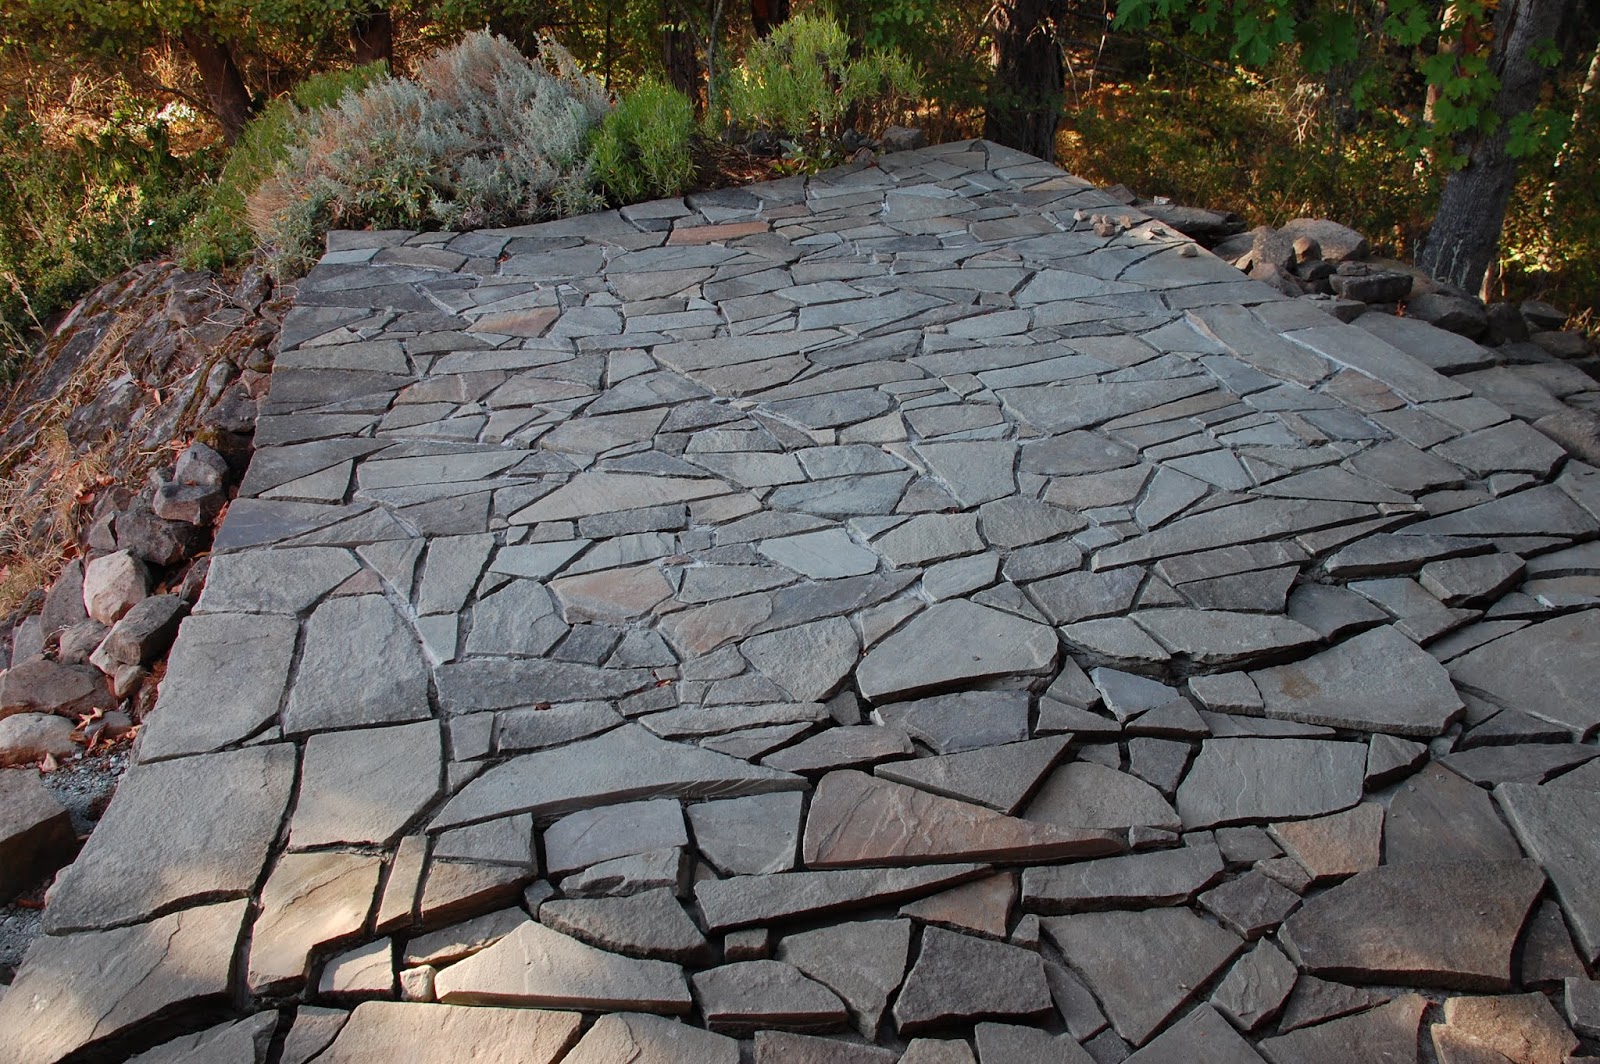
October 2018 after Thanksgiving


Funny that thing about achieving higher productivity as goal one. It's what the paid artisan has to constantly do: find the way to keep the job progressing economically, whatever the prevailing conditions. Amateurs are not good at bulling jobs along, and I am amateur. That said, when looking at a big task like seaming the joints between so many small pieces of stone (perhaps five hundred plus), one may be tempted to try and bull some further productivity in order to feel that the job is actually moving! Hope is a funny thing, and to complete work you have to see tangible change towards an end in order to sustain it. But bulling the job along can be the wrong path for someone aspiring to pleasing results, especially an amateur like me. And it would be so in this case too, as hurrying the job nearly always leads me to make mistakes. (Note to file: things take as long as they take, so let them). I have been asked why I don't just leave the stones unseamed, as the voids this creates make for a pleasing emphasis. My response is simple: it's a trough for organic matter to accumulate and then it grows moss, which quickly renders a terrace unsightly and unuseable.

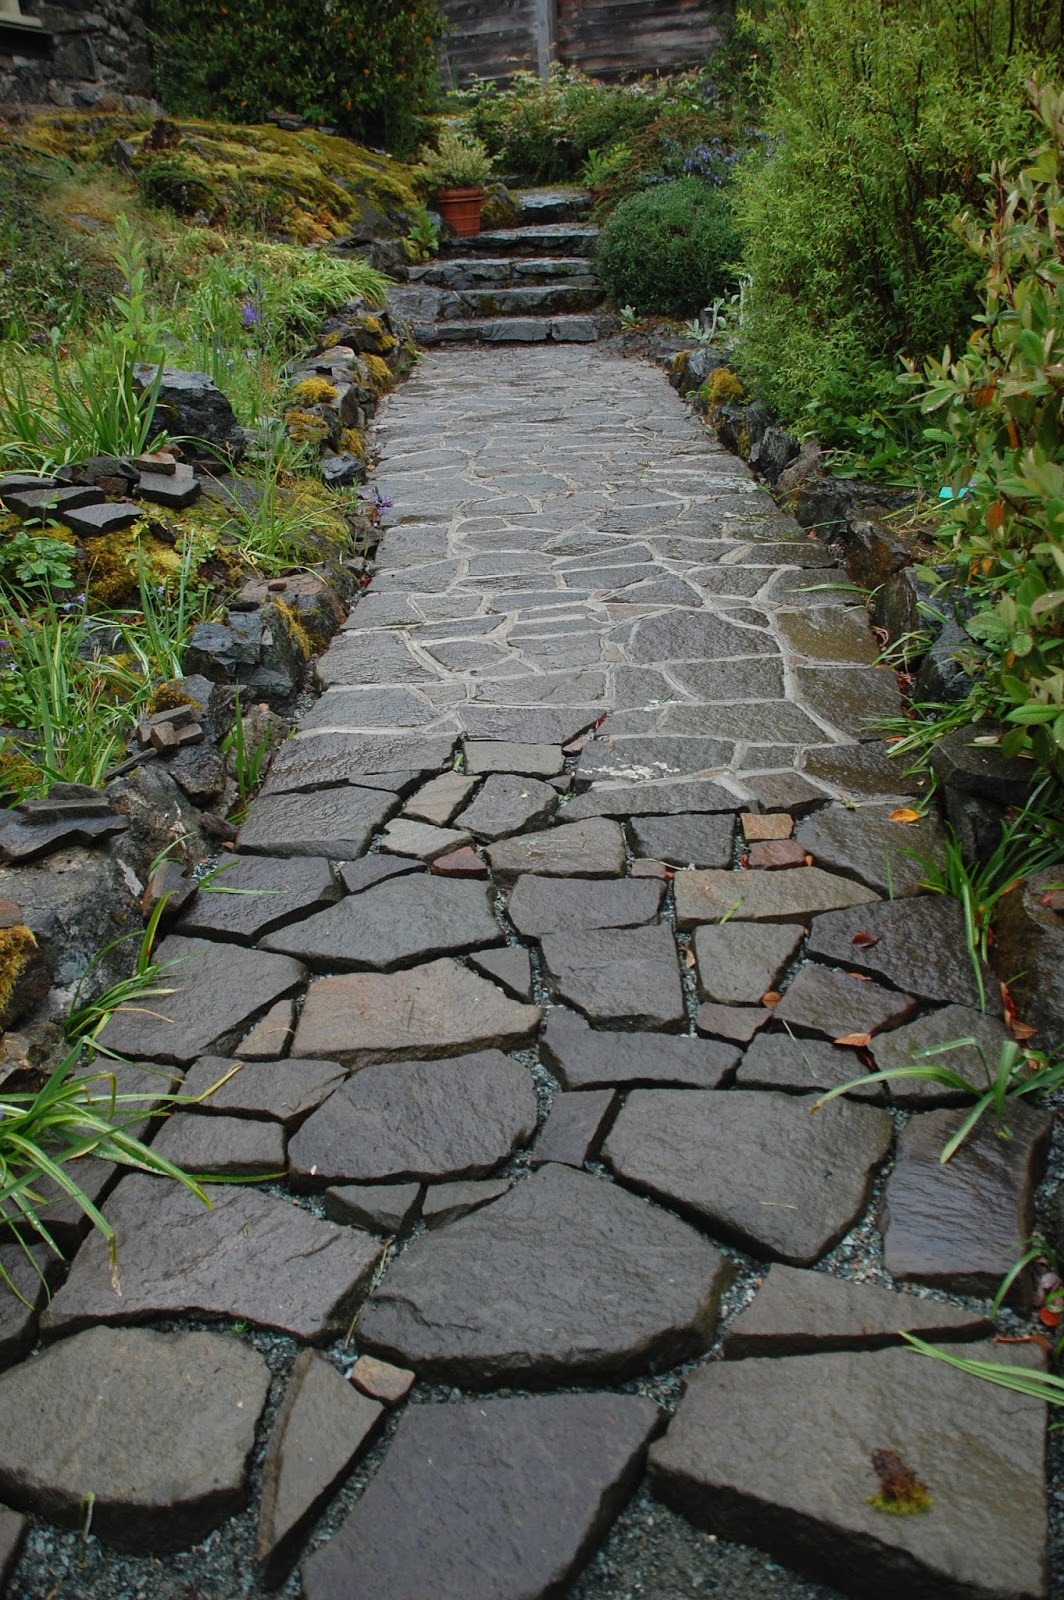
First attempt at filling joints between stones, October 2018


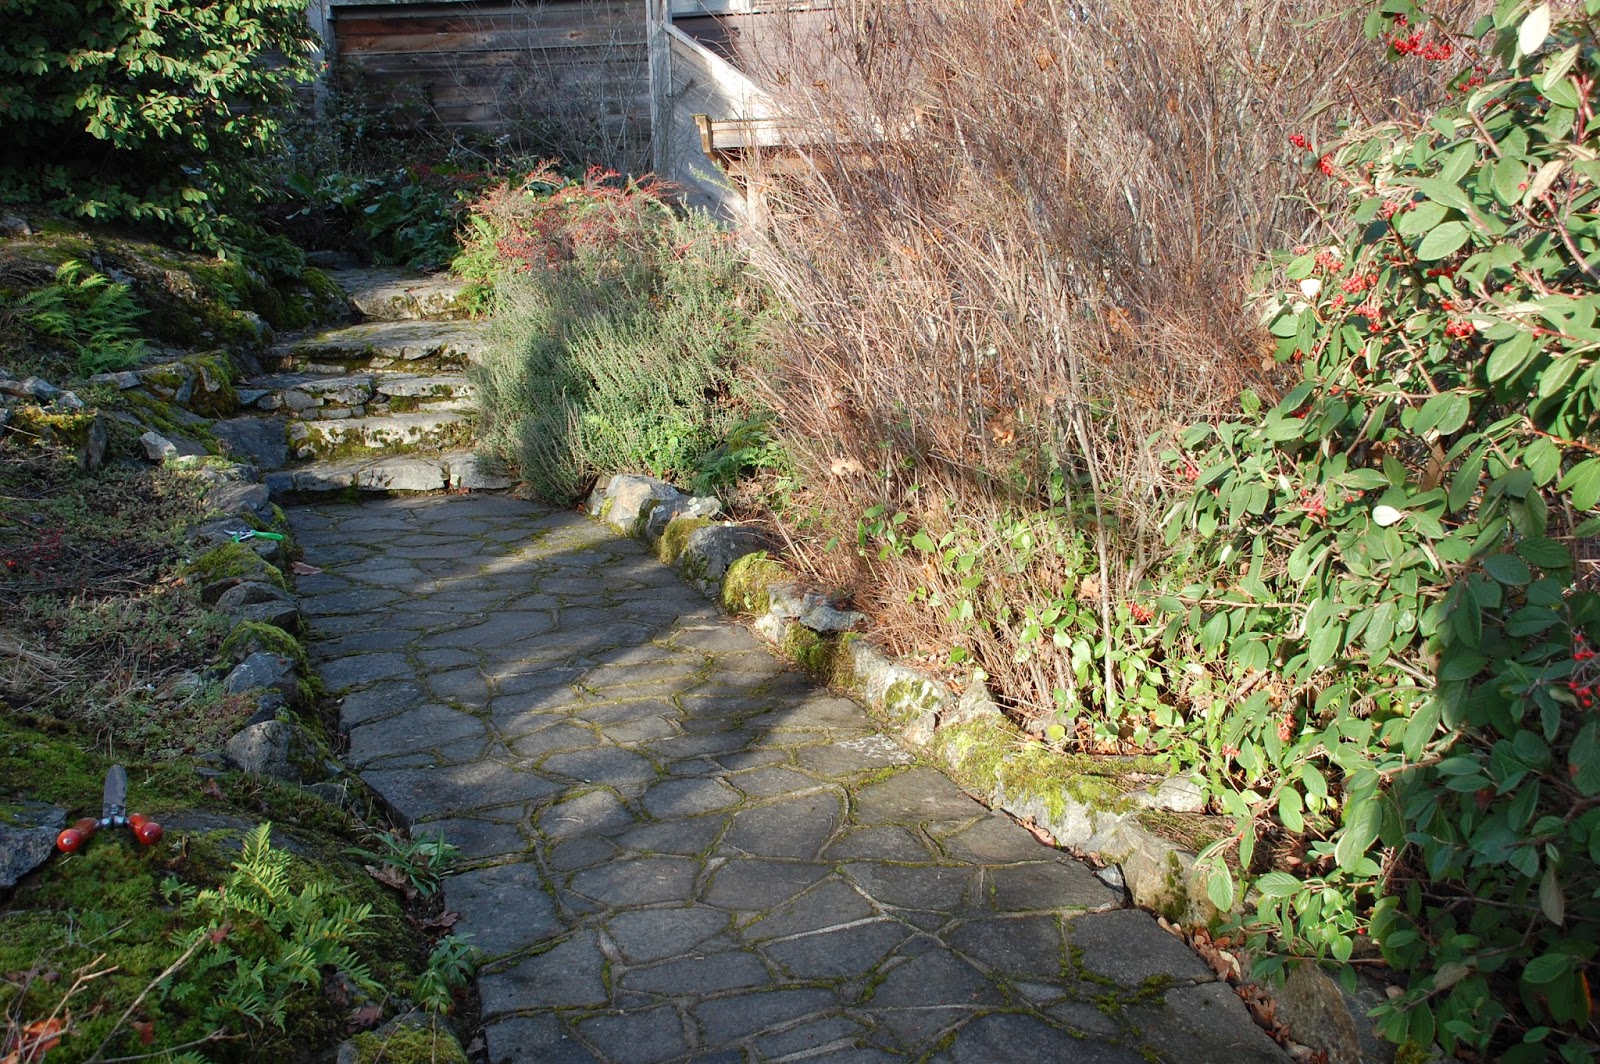
It had been quite a while - perhaps two years - since I'd done any mortaring of joints, meaning that at the outset the skills had to be, if not exactly reacquired, then re-activated. This is just simple recovery at one level, because one has in fact done it all before and thus the way is known. But there are often unexpected curves on the road to the new Jerusalem of pleasing outcomes, and a reliable source of such curves is that accursed aging process afflicting us more with each passing year. Stone paving involves lots of kneeling and extending the body out over the work - in effect, cantilevering yourself. This is more easily accommodated while young and flexible, less so as one is more antique and creaky. Transferring mortar to thin seams requires patience and accuracy, or else the risk is that you spread cement onto the pavers in the process. My process involves transferring small quantities of mortar at a time from a bucket using a Richard knife (see the yellow handled tool below), then easing it into the voids using a tuck pointer (a tool bricklayers use to finish their work) and then tooling it to give it a finished effect.
So it turned out that my efforts to make time by bulling the job along were in conflict with the higher goal of making neat and tidy work. And also, that I needed a method of correcting my inexactness, which was tending to result in mortar spreading itself onto the pavers themselves, leading to unaesthetic effects.


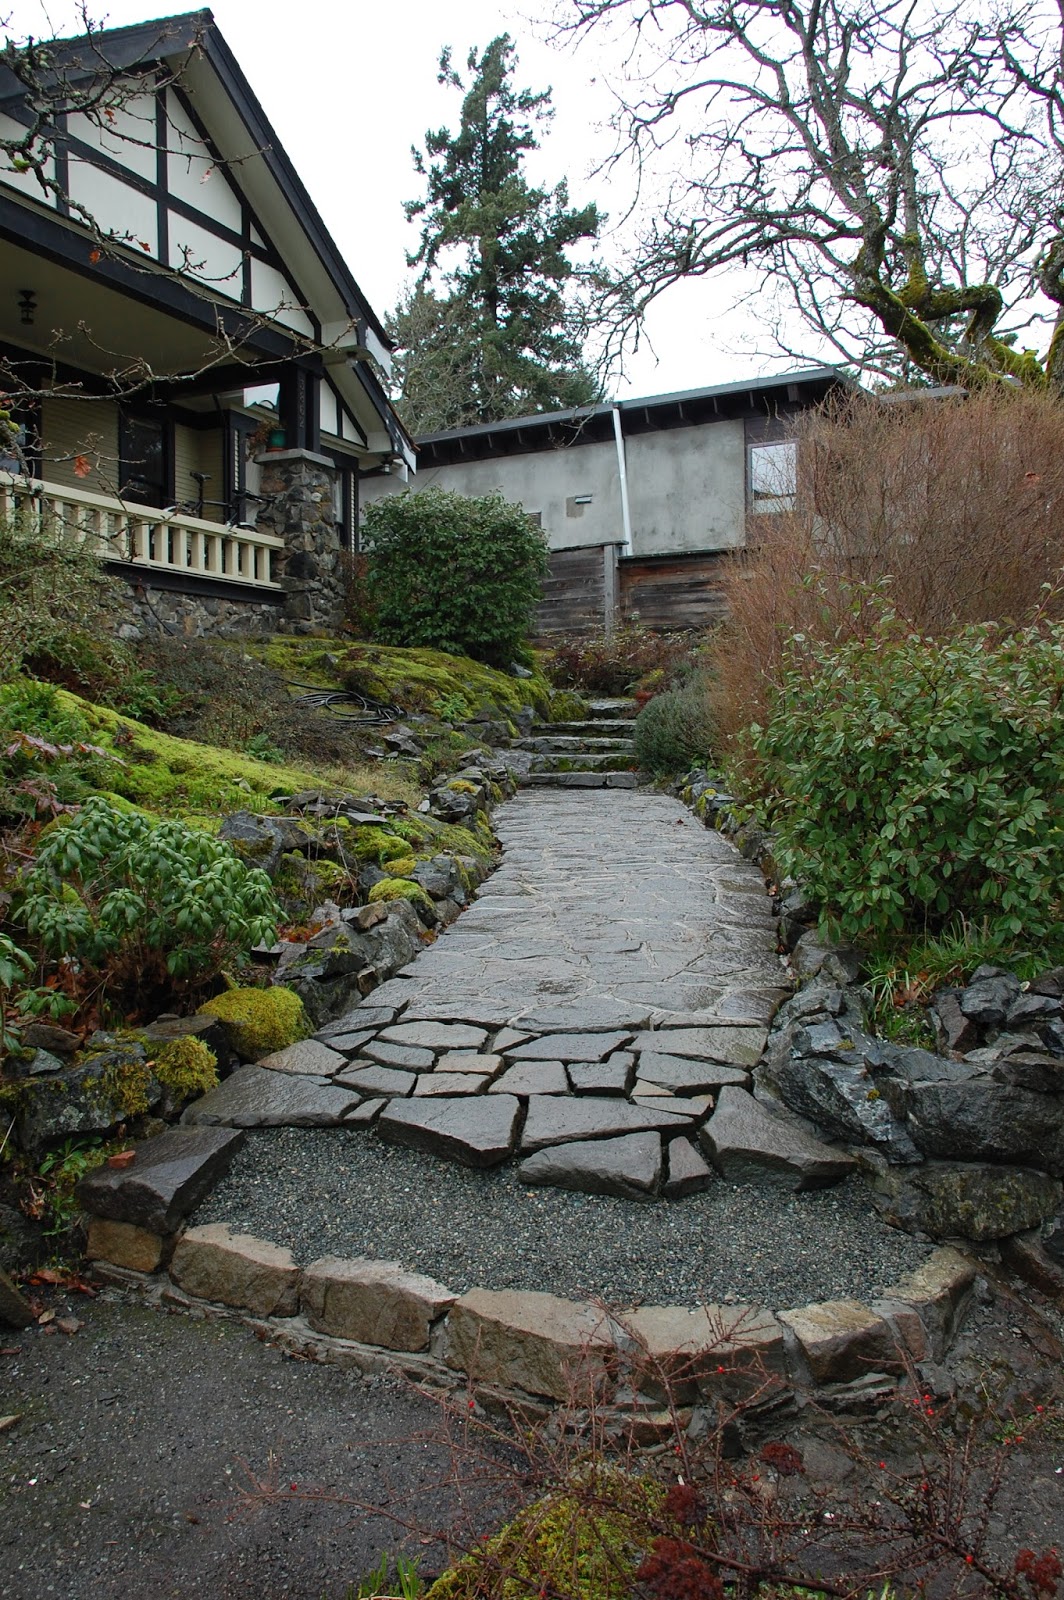
I staked a claim (just) to filling seams when the work came to an abrupt end for winter


The solution here turned out to be two-fold: first, slow the process so it becomes more precise in the doing; second, remediate after placement as needed using a wet, frequently cleaned sponge, so that any spread is removed. Trying to go too fast - privileging output - again got in the way of both of those things. Foremost, it was necessary to relearn how to take my time, work attentively, and remediate as needed. This involves existential adjustment - the work will take the time it takes, your job is to ensure it's done well. Capisce?

Winter seaming is feasible occasionally, ie. weather permitting. In cold weather the mortar doesn't set up quickly, which makes slow work that much more feasible. But one has to be opportunistic in exploiting weather openings, because in winter they tend to disappear. Damp cold is anathema for older bodies. For example, by early February things were starting to feel like being on the verge of spring, so I began thinking about getting back to the terrace. But then presto, winter returned with a vengeance, so it would be at least another month before there was any progress. 


On the plus side, one doesn't use up a lot of cement, as the work of placing and then finishing and dressing the seam is time-consuming for small distances. It's careful, precise practice, with some cleanup extending the time taken to complete a smallish area. A bag of mortar used for seam filling lasts a long time indeed, especially when the work is sporadic. However, a single bag of mortar can develop problems over the course of a long, wet winter, from ambient moisture being absorbed through the walls of the bag. As with this bag, indirect exposure to moisture eventually began turning some of the dry mortar into tight lumps spread through the loose sand/cement mix. I continued removing these larger lumps of material so I could draw on the loose stuff. This worked tolerably well for a time, until one day it no longer did. Nearing the end of the bag at last, I disregarded my inner voice's suggestion of new material, and so did several bouts of seam work that I discovered simply didn't firm up in the usual way. Upon touching them two days after placement, they collapsed into grains of sand. There hadn't been enough cement remaining in the mix to firmly stabilize it! Suddenly I was facing an unexpected problem of my own doing, one with some significant wrinkles: the work would have to be chipped out of all of the unstable seams, a laborious job. I won't deny I was initially demoralized at the prospect.


Then I realized I had no choice but to accept the challenge, and so began removing the material with a hammer and chisel. The big hurdle wasn't removing the dusty mortar, rather it was the method of collecting it afterwards, so as to prevent working the resulting cement dust into the surface of the surrounding stones. Brooming it up into a dustpan was also a non-starter, serving only to ensure the spread of residual cement into the surface of the stone. Then I remembered the shop vacuum and immediately saw its potential as a clean way to suck up the dust and chips from the excavated mortar. I have to say it worked like a charm, although the shop vac itself needed rather a lot of work afterwards to clear all the fine dust.


By June 2019 we are beginning to see more progress. I have accepted the need for patience and care at this point, so things take the time they take. I'm focussed now on making the most of each of what I call 'panels', which is basically the stones in their immediate associations. Of course, the whole thing is continuous, and there are no panels in reality, but as we fill the seams in distinct areas, we are increasing or modifying the association of the collection of shapes. This is, properly viewed, very funky stuff in the prettiness of outcome department, the place where rubber meets road, and also the place where effects are captured and intensified. By this point I'm finding a rhythm that's almost meditative and zen. I do not think thoughts about problems while in this space - consciousness is fully engaged with the materials. My average work bout runs from three to five hours, at which point my old body is done and quite ready for a hot bath and a long scotch (ah the pleasures of retirement!). But this is also the time when the contretemps with inadequate cement occurs, so I get to spin my wheels for a time again, before regaining my rhythm.


Unexpected rains in early July stall progress briefly, but you can see the momentum in the picture above. It's the more graphic for being after a rain, when mortar and the edges of pieces are emphasized more than the dry centres of the stones. I love this kind of day, when I get to go forward but have this emphasis provided by nature that makes everything so graphic. Once we complete the bulk of the terrace, it's time to return to the challenge of the steps, and the continuation of the terrace around them. I begin to lay them out in advance, to have an idea where the terrace will run up to them. As usual, I get too drawn into one thing without remembering how much each thing depends on the other.


 However these steps finally look, terrace has to be built around them, and appear to continue under them. Soon it will be time to take the existing wooden steps away, so we can actually see what the proposed step layout looks like. I am evolving the first step here, around some facing stones and a large central stone. It's complicated because the ensemble has to 'turn', in order not to land mechanically on the terrace. Nothing would be worse here than a crudely rendered geometry! As you can see, I've returned to my process of mortaring a plinth in place to lessen the depth of mortar I use to fix the stones. This is a necessity born of variable width paving material, a sign of the randomness of my available materials.


I'm trying to evolve this ensemble organically, but I'm actually missing the boat. My front pieces, though happily associated, are laid out as if they can stand alone on top of the terrace, with the step fitted neatly in behind them. This turns out to be a fallacy - the step (one of two up to the wooden landing) - needs to rise to a height greater than the height of the front stones. To accommodate this, there would need to be stone risers under the front step in order to level the front stones up. This, it strikes me suddenly, would be ugly. I try a few fits on in order to assess the problem, and it turns out to be real. There's no way I can see to put something under these pieces that doesn't destroy their feeling of being 'naturally' placed. Reluctantly, I begin to accept that my design has to change. This is the reality of stone masonry - concepts get lost in translation, and we have to invent something entirely new.


Despite a growing awareness that my step design must change, I continue to pick away at the terrace surrounding it. Slow progress, but fairly sure. I am enjoying this piece of it without knowing where the overall design is going. I do know that my steps need to be just shy of eight inches in height though, which will govern the height of the fronting piece. I begin searching my rock pile for possibilities.


But despite the uncertainties, this remains big fun. I love the process of lining the seams, basically tooling them with narrow tuck pointers, to create an intentional effect. This is an involving task but one I actually look forward to. I care not a whit that other people treat the seams as background to the stones, minimally softening them, sometimes leaving them rather brutally (to my eye) unkempt. I am simply doing my own thing, trying to find the way to combine beauty with utility.


Tuesday, August 7, 2018

Manufacturing pavements


"a manufacturer means a person who makes with his hands"

William Morris


Design is an abstraction, while pavement is a physical reality; design hints at outcome


Design is merely a sketch in stone, an intimation of what might be. After conception and refinement, a point arrives when the design is pretty much worked out and the project moves into implementation, where it becomes a real and persisting entity in the world. There's a gulf between these two aspects of stone creation, despite both being achieved only by much kneeling. Yet while action passes to manufacturing as activity, its content is intimately linked to design. For the sketch to become reality, it must pass through the process of manufacture: a time when tools, materials, and loads of handwork come together, deployed systematically over long periods of time in order to bring the ideas embodied in the design phase to life. However long the design process continues (and as the sequence of Finding Form posts indicates, it was long given my periodic availability to the work), the manufacturing phase is much longer in hours worked and energy expended - so there is inevitably a lot more skin in the game. This is where rubber meets road - admittedly an exciting point to reach, but portending much physical effort, so a body had better be ready for what's coming down the pike. On the up side, I am finally retired from full-time work, so in theory I finally have the time to be more disciplined about the project; on the downside, I have an aging body that's been sitting for years at a desk, and this direction is taxing work. I was uncertain when starting up the manufacturing piece whether I still had the jam to get it done. I am still finding my way with that.

I'd already begun manufacturing this paved terrace when I last posted, discovering belatedly just how much work was needed to extend portions of the concrete pad to support my wandering edges. Part of my purpose is to replace a needlessly blunt geometry with something that speaks more directly to the imagination. In the layout phase, I could simply overlay the existing edge to see how a wandering line (off-geometry) might be gained. But in actually making the paving on the cement pad, the base under the wandering edge required extending - meaning adding some dimension via supplementary process. This necessitated collecting small chunks of stone, cleaning them up, and having them ready to hand for the process, and engaging this prior to sticking down the edge stones. I had to relearn how to segment my work, which is a good lesson to acquire. I had to engage in preparatory work before the visible edges could be placed. I struggled with this added complexity at first (OMG, too many things all at once for far too long), as I was having to recover rusty skills buried in past projects dating back a couple of years at least. I more wanted to be palpably progressing towards finished outcome, and injecting another three hours into the terrace didn't actually seem to produce much outcome, at first. The labour felt a bit, well, sisyphean (pushing the rock uphill, only to have it roll back again). At this point I seriously wondered if physically I'd actually be able to complete this - had a I bitten off more than I could chew, had I waited too long to tackle physical work? I still haven't established that I can actually get it done (check with me in October), but I'm able to report real progress, and say that I'm encouraged by how I'm now working - aches and pains aside.


Despite the time needed to stick them down, I love the feeling of permanence in the result


The photo above is where things had gotten to several weeks back. Perhaps ten bouts of three-to-four hours each had gone into it. The yield may look small for this investment of time, but we are definitely picking up speed at this point. And this despite the fact that it's now high summer, and you can't be doing this mortaring in full sun. So I've been adjusting how I approach the work, to take better account of ambient conditions and of my personal tolerance for bending and stretching. For one thing, I now rise early and get my main bout in before the sun reaches over the building and strikes the terrace (about ten thirty or eleven o'clock). I usually try for a second go later in the day, but this (it turns out) is a less-committed chunk of time, and I often faff about, tiddling layouts and getting things set up for the main event next morning. Another thing I'm doing in order to adjust to the strain on my shoulders, elbows, wrists and hands, is distributing more of the bull work to the left side of my body. The right side not only does all the fine motor work - the executive skills, including transferring, placing and snugging in the mortar with various tools - but also tends to do much of the lifting. So I've consciously taken to doing more of the lifting with my left side, ditto the mixing of mortar, all which it is equally capable of.


Freshly laid plinth, adjacent to (upper right) previously laid plinth at a different depth


Method develops slowly, based on trial and error. Mine has to take account of the mix of paving stones (some thick, some unfortunately thin - alas, those were the materials available), which sets a height for the overall terrace, and in turn sets the depth of mortar under the thinner stones. I've gradually adopted a two-phase method that makes most sense, where a plinth is set for thinner stones one day, and then they are cemented on a fresh bed of mortar set on the still-drying plinth the next day. This avoids a situation where there is too great a depth of loose mortar, causing stones to flag at one end or side while the mortar sets up. Above, a new section of plinth set down next to a section (upper right, light grey) done the previous day, now ready for its stone. These are loosely shaped to correspond to the shape of the stones they will hold.


One day you make plinths, the next you fill in the voids - deeper stones first


Panels of stone, each contiguous with the next grouping


As I gradually refine my approach (working across the width to a loosely defined depth) and get better at avoiding self-made snafus, I am trying to ratchet up my output so more is completed per bout. I refer to this as  developing momentum around the job - getting more practiced at it, more deft and consistent, and trying to inhabit the space sometimes known as 'flow'. Flow is an intriguing state of mind that is enjoyed by artists especially, characterized by an absence of conscious mental operation and a oneness with the medium itself, such that the operative is absorbed entirely in the work being done (being 'in the materials'). I can report positive results from attaining this space - results that tend to build on one another, impacting the rate of progress. I am definitely and decidedly fully inside this job now. My productivity is certainly rising, without a major negative impact on quality of output. My body is adjusting to being called into service on a daily basis (with Ibuprofen and Scotch for backup). And I am vested in attaining the project, with a disciplined approach, regular increments every week, and the patience to see this idea through a long, slow schedule of construction. I have in fact lost all impatience at this point (how zen is that!). I am uncertain just how long it will take to complete, but I will be very pleased if we are moving to closure come Thanksgiving (we are now a week into the month of August!). Paving is decidedly a long road and not for those who want instant results (try concrete, use your phone camera), but the result is, to my eye at least, quality - which adds so much presence to a landscape in the vicinity of a house. The terrace is all about human use of the immediate out of doors - but it is also seen through a number of windows, so is view-framing from many angles. I am excited by this process!


Placing stone on settled plinths, making new plinths for next time around


The wet area represents about fifteen hours of concentrated effort (three working days)


Tuesday, July 10, 2018

Finding Form Encore


Fall brought the possibility of advancing stone layouts towards finished form. Desk work at my day job interfered with pursuing completion of layout, but I continued refining the design, tweaking it, tightening it, and getting it ready for mortaring, sporadically through winter and on into spring. Tediously slow but surprisingly fulfilling work. Mid-may saw me finally retire from paid work and I quickly begin expanding the time available for finishing layout and starting the process of sticking the stone arrangements in place. It took forever to get to mortar, perhaps because I'm hard to please. But I had many a day out on those rocks from mid-May until late June, chipping bits off stones and tightening layouts, where the sheer fact of being there and working the stone was sufficient for satisfaction. Progress is slow at best in this idiom, patience more necessity than virtue. With patience, and time of day and quality of light, come transporting views of an evolving scene, especially for a creator of form.


There were a lot of objectives embedded in this terrace layout. For cosmic reasons, I wanted the stones' placement to reflect the flow of natural energies across the terrace: wind, water, waves and sunlight all pour out of the south towards the north, meaning the stone would run crosswise to the length of the pad. This aligned with another layer of choice, just as zen, which was to run the stone counter to the length of the pad in order to slow the eye and expand the perceived extent of the realm. My view is that you want to hold the attention of the viewer, and that that is best done by checking the flow forward. So energy flows in nature aligned with energy flows in layout equaling, in my cosmology at least, increased synergy and harmony of feeling in the outcome. I also wanted there to be further hints of our oceanic environment, as in distant references to schools of fish flowing through the space.


Flies in the ointment here: nice that you got that layout snugged up, but now there's the underlying problem that the concrete pad with stones sitting on it for months on end has concentrated organic matter, including moss, through the various effusions of fall, winter and spring. So what? So, before you can begin sticking the stones in place, you have to clean what's under them in order to achieve a better bond. Tedious, yes indeed; necessary, ditto; patience required, beyond measure but indispensable. See below:


It will also require scrubbing down with a stiff brush and a hose, a supplementary step and then a drying-out afterwards. But this is the path to a happy, lasting outcome, and therefor must be done. And it's not a process to be hurried. Further complication emerges once the step into mortaring is taken: edges suddenly need shoring up, since my making them wander overtop of the rigid geometry of the pad, to take some steam out of the declaration of straight lines, means expanding the pad to support the new edge.


Wandering edges requiring a base weren't the only problem, however. I was rusty, plain and simple, not having mortared for well over a year. My knees, back, shoulders and arms were a year older, with significant consequences. As to technique,paths have their own unique requirements: batches of mortar that are manageable in size but sufficient to complete a segment; techniques for placing and pinning stones to fill in large voids and to ensure that stones set on over-wet mortar don't slump (I set it a bit loose in summer heat). As it happens, it takes a while to recover a sense of how all that's best done, and how to recognize an emergent problem and nip it in the bud. There was more of a struggle with self for the patience to accept the unforeseen and address it. But it does come back, and fairly quickly. All the while, the rough layout encourages one to pass it through the process so that paved scenes can begin to emerge. It's a bit like giving birth when they finally do. I offer some below.


As I stick these stones down into what I hope is a long-lasting relationship with their neighbours, I often think of what I'm doing as 'working on panels'. Despite the terrace being continuous, each set of stones has an intimate relationship with those next to it, and some resolve into distinct patterns despite their integration with everything else. I enjoy this aspect, emphasizing it when I'm in the trimming and tweaking layout phase. I try to keep whatever I've found my way to - a sort of dynamic, even cosmic balance, for lack of a better term - through the mortaring phase. This is a moving target, into whose trajectory loads of factors, some exogamous, enter. But I still like the idea of completing panels as units and watching the whole grow slowly in extent. 


You can see the base extension I'm doing in the photo above - there's a glimpse of some brutal modernist geometry just visible at the far left, the rest is a bump-out intended to secure the full curving alignment of this stone. It works pretty well, just entailing a supplementary set of operations before you can get to the main event. Patience, patience, patience.


Then, you mortar it into place along with its companion stones, and you glimpse form emerging. Paving occurs as an event in time, so exciting if you are the one making it happen. For others, bystanders and onlookers, not so much. But then, people generally are tuned out and will simply not see change occurring at this level. The beauty is, a slow process leads to profound change, and even the insensitive experience it at some point. If it works out, it will command people's attention while feeling that it fits in entirely.

Saturday, February 3, 2018

Romancing The Stones


Repaving paradise


In January 2015, on a wet and slightly misty winter's day

Original asphalt walkway in summer 1988, serviceable enough then for continued use


The job was unavoidable in the end, though I succeeded in putting off the day of reckoning for a long while. Partly my delaying came down to simply not knowing how to go about replacing the old walkway pictured above: asphalt to stone was a certainty in my mind, but which stone, from where, and how placed? Ultimately though that old front path had to go, its thin asphalt veneer wearing through in spots after many decades of use and weathering. And in fact it had been rather hastily made, probably at the time the original holding was subdivided, and without much attention to details. The puzzle was how to effect a change for the better, especially as the path would have to remain in continuous use for access to the front door. There was no option to switch to using the back door while the front walk was being replaced, so it would have to be done without taking it out of use. This dilemma stumped me for a long time. Then one day, after much canvassing of possibilities, I resolved to get started without having all the answers in hand. That day only came about because by then I had found what I felt would be suitable stone and assembled enough of it to be certain of remaking the entire path as a unified whole. Rendering the new path as a unity mattered because of the arts-and-crafts thinking governing design of the house, which had been contrived in intimate relation to its unique landscape setting. So it was essential that a new path integrate seamlessly with the existing ensemble of house and landscape, now over a century old. The path's overall alignment wasn't in question, only the materials and dimensions of the replacement surface and the process for getting it done. As it happened, an opportunity to collect sandstone in random chunks came along. These pieces were flat enough for paving and of fairly uniform thickness, foraged and stockpiled over several years at a family place on a nearby Gulf Island. The stone was pulled together from small openings (driveway cuts, building pads, etc) in the local landscape, supplemented by some quarry leftovers, collected over a couple of years.


Sampling of newly gathered material, just washed: irregular shapes, subtle colour variation


Glistening with potential after washing, end of day, October 2009


When I finally had enough stone to be sure of completing the job, the only thing standing between me and tackling it full on was the fact I'd never built anything similar. I had built or repaired a number of stone steps that formed part of the pathway, and had made a circular stone patio (inset below) from a melange of paving materials. But here, by virtue of this being the entry pathway, a lot more was on the line. So, lacking a clear sense of
how to set these irregular chunks of stone together to good effect, I felt I needed to gain some experience before tackling the big job. The fact was, this was the chance to create something that improved on the defects of the current paving - not least its baldly utilitarian quality. Asphalt is not, to my eye, a nice paving choice for an entry path, especially not one integral to a gardened environment. Asphalt does not contribute to a sense of place, nor offer a distinctive impression under foot. In its current state, the path enabled movement acceptably, just. As this path follows a rather elaborate alignment, taking visitors on a leisurely stroll past the building's facade before finally switching back towards the front door, I felt it merited loftier treatment. So the quality of the replacement paving mattered architecturally, to both landscape and dwelling, and to me personally, as I was determined to add some beauty to the utility of the existing alignment. I wanted the path to offer anyone transiting the space a sense of entry as memorable as the dwelling place itself. These aspirations set the bar fairly high, looking back on it now.


Pulling suitable smaller chunks from shot rock in a quarry, most of which isn't suited to paving
Once collected, quarry muck needs to be washed off; here I'm capably assisted by my son Bryn

 
At this point I lacked confidence that I could actually work out a full design for the path in an evolving sequence on the land. Really, I had nothing to go by, no rules of thumb to guide layout and design, only my own determination not to screw it up. I'd learned a bit about setting flat stone from making the stone patio, but nothing about laying sandstone. So, having space available at the site where the stone was cached, I decided to practice by laying out a sample run of path, and set about doing this using a lightly graveled area as a makeshift base. This process allowed me to play around with placement with nothing riding on the outcome, and so to learn by doing and redoing. 'Play' was the operative term. I enjoyed getting to know the stone and I liked the results of this effort, and in fact looking back on it I still like the feel of that embryonic pathway and rather regret it was never built. Indeed I liked it enough that at the time I even toyed with transferring sections of it back to town, thinking I might be able to adapt what worked in one place to another  locale. An attempt at doing this showed that literal transfer would be more difficult than imagined, and of course revealed that the segments weren't precisely sized for the width of the new path anyway. But I sure did enjoy the process of making a trial path and, as the following pictures show, I gleaned enough about putting fractured pieces of stone together to see how to achieve a fit: edges echoing adjacent edges as much as possible, ultimately generating a feeling of integration into a new whole. You can gauge my initial progress by the next few shots.


Figuring out how to place stones so they feel comfortable set alongside each other

This experience went on over a number of weekends spaced out over some months. I continued experimenting, so began leveling up the stones with sand infill in order to make them appear more flush, a step that served to bring the overall look into sharper focus. This leveling process also magnified any gaps needing attention before finalizing a layout for cementing - gaps that weren't as apparent in rough layout. This in turn clarified to me that a distinct step towards tighter alignment would always be needed. I worked at refining my layouts for some time, distilling some insights as this process continued. I also began doing some research on approaches to path making that helped me sort things out. One perception this gave rise to was the value of using somewhat larger and chunkier pieces for the outer edges, a practice that gives a path heft and solidity. Looking at pictures of Japanese garden paths revealed patterns of using larger edge pieces to create the frame for a visually engaging flow of smaller pieces of stone, a relationship that simply felt right to my eye. This approach also led me to begin using small geometric chunks (triangles, squares, oblongs, etc) to infill residual voids and tighten up my layouts before setting. In doing this it became clear that laying the stones across the direction of the path (ie horizontally) slows the path's feeling of forward motion, resulting in a more relaxed composition. The converse is also true, and for my purposes was to be avoided (setting stones in the direction of the path speeds up the sense of forward movement, hurrying the eye along). More romancing of this experiment follows pictorially.


If you lay the pieces crosswise to the path's direction, the feeling of forward movement slows
I got quite attached to this path after refining its layout and leveling it up
Transfer of this layout to the front of the house seemed desirable, but quickly proved impossible!

 
At this point I realized I just needed to haul enough of my stone to the actual site to begin the pathway on the ground, accepting it would not be laid out in its entirety all in one go. This seemed a big leap at the time, requiring me to take the risk of laying it out progressively in shorter segments, bringing each one to finished state before starting the next. I do like to see what I'm fashioning before setting it in cement, but knowing I had a supply of consistent materials allowed me to feel I could achieve a unified whole despite building it piecemeal. Sometimes you have to get out from under abstractions, which here involved adapting to the idea of tolerating the unknown for indefinite periods of time. So I began trucking stone to town, and at a certain point, I just dove in. Of course, some of the old path had to be knocked out first, which I did in phases in order to preserve access throughout layout and construction. I also excavated the existing underpinnings as needed, replacing coarse gravel and sand with compacted road base, in turn topped with a bed of three-eighths minus (aka 'crusher fines') as a prelude to starting layout.


First segment in rough layout, needing tightening and closer leveling before being mortared


Once I'd taken the plunge there was no going back. Fortunately, life contrived to hand me a period of relatively greater disposable time. The photo above is the first of the inchoate pathway, in a rough initial layout. A sense of expectation grew as I placed those first stones and saw the jigsaw puzzle begin to emerge on the ground. This first phase lasted a while, as I had to formalize my approach to working with these materials. I quickly realized that daily comings and goings over pavers set loosely on a bed of crusher fines are an effective way to pre-load the base in preparation for eventual mortaring-in. Once I had brought the first section to a point where I was satisfied with the layout, the next challenge was to develop a way of keeping the path operational while setting the stones in mortar. This I did by working on one-half its width at a time, barriering that portion off so the mortar could set and harden. Fortunately, my family is patient with my slow-motion paving efforts, so was willing to put up with inconvenience while I figured out how to make progress. Effectively there was no other choice.


Spring shows progress and a foretaste of how it will look finished up

 
Considerations of utility also entered into the shaping of this new path. While the alignment was settled, the path needed to be wider than the past design, which pinched unacceptably at points. My goal was to make it wide enough for two people to pass comfortably, which is fitting on a main path and necessary for the moving of goods and appliances, some of which are quite bulky and all of which have to enter through the front door. As the path makes its way past the rock outcrops the house sits on, the
land rises towards the house (see inset), while leveling out into a narrow bench on the other side of the path. Retention for the existing path had been awkwardly handled on the house side, which I judged needed rebuilding in a lower and more horizontal profile. And I was coming to feel that a degree of symmetry in these banks would be desirable, which meant securing enough of the appropriate material to edge both sides uniformly. I opted to use rock collected on site for the edgings, thereby continuing a past choice while supplementing my supplies with material foraged from a nearby highway cut. All of this local metamorphic rock would contrast nicely with the softer and warmer sandstone used for the paving. 


There was also a broader aesthetic concept forming in the back of my mind as the path began taking shape on the ground, involving the analogy of a stream-like flow across a hillside. Stone paths readily develop feelings of movement or flow, so I became curious to see if impressions of path-as-stream could be conjured and amplified in the disposition of stones. I knew I wanted to lessen the slope on the main run somewhat, which meant introducing a heightened step at the bottom end to soften out the gradient. This background idea of hinting at stream-like motion proved a fruitful metaphor as the path grew in extent, affecting both the ultimate placement of the new step and the dynamic shape its lip would assume to symbolize directional flow. But where the enabling step should be placed, how it should capture the feeling of stream moving as a body downhill, remained to be worked out. The base of the step would also become the point at which the main path divided into two distinct channels, one major in continuation of the path towards parking and the street, one lesser to accommodate a junction with an informal path from another part of the garden. In my estimation, the main path needed to project its flowing motion further downhill than the current configuration, whose actual purpose (step or retention) seemed unclear (see below).


An existing half-step appears directly behind the roughed-in new step, but would need removal!

Initially I wanted to keep the old step for retention, but it would have pushed the path too high


I initially thought I wanted to keep the existing step as retention for the base under the new path. But after trying this on (above) it became clear that the old makeshift had to come out and that a new step would need to be elevated on its own base course. The land begins to fall away more sharply through this section, so a distinct step up was desirable for both accessibility and to reinforce the impression of a stream. Best of all, my initial effort at layout without a base turned out not to be wasted at all, as it enabled me to arrive at a dynamic flow-form for the top-tier stones. And, having that top course in design allowed me to know exactly where to place a base course under it! The next pictures show this new layout evolving.


Old half-step knocked out, new base just mortared in place, echoing the proposed top course flow
Viewed from above, illustrating how the corner could be turned on the left, again capturing flow

A great deal of playing about went into this phase of the work. The layout needed to flow freely while feeling closely built-in at this point too, so plenty of tightening and refining went on before anything was set in mortar. Once the base course was in place, I could backfill the crib with fines and raise the actual path to working grade. The step base incorporates an intriguing curve (seen from above, it's flowing outwards in a dynamic bulge) that to me visually implies forward movement, spilling around the rockery edge (at right, below).


Base for retention, now filled with crusher fines awaiting surfacing

I'd gotten caught up in working out a shape for a bed adjacent to the path while making the pathway proper. In effect, the two helped design each other, as one strand of the path would curl round the new bed edge and head off in a novel direction. You can see that bed evolving to the right of the path in the pictures above and below. Rounded at the nose of the rockery, this would cause the path to flow around it to generate an ancillary path running off the main one. I really enjoyed the process of knitting these elements together in design, and then finally fixing them in place with mortar.


Nearly ready for fixing in place, the step's form accommodates a secondary path branching off


By this point the sequence of tasks leading to finished path had become formalized in my practice: first, lay down base materials, then rough-in initial layout, then tighten spacing and placement (including some reworking of the stone to smooth out ragged edges), then mortar stones in place, followed finally by filling and tooling of seams using tuck pointers. If the chunks of stone are thick enough, they can be set directly in cement; if thinner, they may need to have a base of cement and smaller stones for a foundation. Each of these phases absorbs time, the more so as I approach the work almost meditatively, which affords access to a working space (sometimes called 'flow') in which really good outcomes have room to develop. All this means really is that one's mind is entirely engaged in the process at hand - you get lost in the work and become one with it. 


"When you find your place where you are, practice occurs"  Dogen


I enjoy getting to the point where stones are finally set in place but the seams between them are not yet filled - arguably this is a path's most zen-like moment, because the voids between stones echo the solids and the resulting impression is graphic. Despite their appeal, the voids are filled with mortar because this ultimately simplifies the ongoing maintenance of the path. In our environment, any trough left open fills rapidly with organic material, which readily becomes soil supporting organic life (most commonly, moss). It is tremendously time-consuming to keep such troughs clear of material, which may be alright if you have staff to maintain your infrastructure! Filling the seams with mortar slows this process down, although it does not check it fully and eventually moss does need to be reckoned with. Mortared seams also serve to increase the grip of the path under foot. And, I think they do reinforce the blended, or in Japanese terms the 'gyo', quality of the result, emphasizing unity of ensemble over the individual pieces comprising it. In an English landscape lexicon, designs tend to be classed as either formal or informal, but in the Japanese idiom there is this middle term ('gyo') for designs that seek to blend both formal and informal characteristics. A path that is 'gyo' by design uses informal materials (random shapes of broken field stone or bedrock) to create an ensemble that in turn exhibits a degree of formality. Hence the term stone carpet (or 'nobedan') to describe this sort of mixed but unified path.


Layout now committed, mortaring stones in position, to be followed by seam filling and tooling

Eventually even an approach as slow as this renders a relatively complete product, and the path maker can draw satisfaction from the outcome and feel pride in having actually bulled the work through. I am definitely having those feelings in the picture below, despite my work having really just begun. In fact, this is phase one of the four phases that will ultimately see us to a finished pathway. But here I am enjoying the fact that my notion of a stream appears to have borne fruit, confirmed in the way the step curves dynamically around the bank, drops suddenly like a falls, then spreads out onto a delta (yet to be constructed). At this point I have a growing sense of expectation about where all this is going!


Inventing a new landing


Because I work more adaptively than prescriptively, by eye say rather than by measure, I discover things en route that are knock-on consequences of previous decisions. So when I decided to introduce a raised step in order to lessen the incline of the main run of path, in effect I was also deciding to introduce a raised landing between the steps up from the parking pad and the main run of path. The fact the landing needed raising as a step wasn't fully evident to me until I began its construction, which takes shape in the area directly under my boots in the photo above. Once again, engineering this step up to the landing from the flight of steps from below will serve to level that run, in contrast to the asphalt path which rose up fairly sharply here. Being quite taken with the first phase of path-making, I had ready energy for getting on with what came next. Job one was to excavate the asphalt and even out the landing's current incline. I began closest to the steps leading up from the parking pad, hoping to be able to build right over part of the asphalt - but once again, this was not going to work out.


First, remove asphalt behind the step, excavate, then add compacted base material to build on


I recall this moment in time quite vividly because by now I was totally inside the job and enjoying a certain exuberance. It's a great mental space to occupy: creativity feels like it can just flow on, undaunted by fresh challenges. I felt growing confidence that I could coax the next piece of path into a shape that would harmonize with the segment preceding it. And, I had real appetite for more of this form of self-expression, so I was now approaching the work with a serious wind to my back.


Quick first go at a complex layout, to gain a sense of what it will look like


Defining the height of the raised landing, seeking a gentler slope up to the main path


The landing was laid out substantially in springtime and mortared in during the summer and fall of 2012. I savoured this part of the project, working at lessening the path's downward trajectory through the landing, in a sequence of pleasurable, trance-like bouts of personal creativity. Ultimately it became clear that the remaining asphalt had to be knocked out so the grade down from the waterfall-step could be lessened as it moved through the landing.


Still trying to avoid knocking the old base out, but the slope is too steep
 
Bullet bitten: asphalt be gone, excavate and replace the base


Layout redone, this time in a gentler, flowing gradient, now ready for mortaring in


Seen from above, close to finished version


Closing in on completeness, a couple more presentation stones still to be fixed in place


By spring of 2013, the landing is fully functional and I'm preparing myself to tackle the next piece of the puzzle. Our house is slated to be on Saanich's fall heritage tour in this its centennial year, so it is important to get the work to a point of greater completeness. This next section posed some unique challenges and so had an engaging complexity to it from the start, but prior successes led to confidence that really any obstacle could be surmounted. As the old zen saying infers ('the obstacle is the path'), resolving the obstacles was in fact the way of defining the path.


Looking smart, if terribly new, the main stem of the path is in hand


Fashioning a pair of distinctive steps
 

You can see how the path splits into two distinct channels at the main step, as if flowing on either side of the bed that's defining itself in the foreground (photo above). To me, the analogy of captured motion is graphic here, imparting mystery and interest to the emerging walkway. I am taking care to also reinforce connection to the building's arts-and-crafts motifs by striving for as much of a built-in feeling as possible (the house itself comes with many built-in components, such as window seats, and its form has been gracefully inserted into the landscape). Most principal walkways in modern
suburbia comprise a fairly straight shot from parking pad to front door (typically rendered in concrete, a wonderfully serviceable if bland material), so this path's gently curving and lengthy alignment sits at the opposite end of the spectrum, taking one on a stroll through landscape along the building's entire length before accessing the front door. I hoped to transform this passage into a more memorable experience by making a surface that would feel like it belonged where placed, and over time come to feel as though it had been there for a long time. The use of stone goes a long way towards capturing such impressions of longevity. 


After finishing up the landing, the next challenge was to tie the main trunk into a more minor path that was currently a narrow beaten track winding up from the road through a wooded area of the garden. The existing alignment was totally informal, a trail through a woodland that possessed a certain charm. However, nearing the main path the land rises sharply over some exposed bedrock, which meant the existing configuration charged up an incline fairly abruptly. This was not always easy to navigate, so the thought here was to replace the sharp rise with at least two, and possibly three, secure steps, which would reduce risk and extend utility by facilitating a more convenient access from below. One issue to resolve was scaling the new steps to sit well aesthetically with the main path while fitting them comfortably into the land form.


First attempt to rough-in step edges, after settling a base into place


Complexities abound: bed edges to be formed on either side, landing to continue into first step


There were lots of considerations in finding a design for this segment of path. One decision was to continue the landing around the bed's edge and directly into the top step (above). This would enable moving a wheel barrow through the landing level without having to step it up and down to the main path's level. But the steps really needed to look 'right' for the site, so be neatly fitted-in between two beds that were evolving in tandem with it. There was a lot of feeling-my-way through this piece of the work in order to resolve things like how deep to make the steps. This is where a willingness to play around with prospective layouts really comes in handy. Once you commit to mortaring stones in place, they are well and truly fixed there (becoming the new datum, as it were) - so I want to be sure it's going to work, aesthetically and utility-wise, before committing to a layout.


Top step deepening, developing proportion consistent with the rest of the pathway


Proportioning continues, the top stop deepening, third step now an open question in my mind


Two steps firmed up, top step mortared in, edges taking shape


Introducing steps at this point had advantages, but at some point the newly built steps would need to transition to beaten woodland trail. Arriving at this layout would ultimately become phase four of the project, but the question of how and where to make the transition was still open at this point. A chief concern was to make the steps generous enough to feel secure under foot, as goods were often trundled up this way from a solo parking spot at the road edge, and also to design them to better accommodate advancing age and diminishing balance on the residents' part. And I obviously hoped for an overall consistency and visual balance with the main path and landing, while still giving the steps their own distinctive presence. You need your head in the right space to get the most out of this sort of process, where things are co-defining. The return of spring certainly inspires you to get out there and do it.


Spring returns and the opportunities for continued stone work expand
 
By May and on into June, things were shaping up nicely. The next pictures show the steps laid out and being mortared in, then their seams being filled and tooled. I find setting the shape of a step to be supremely satisfying - you see the form first appear with voids between the pieces emphasized, which dramatizes the forms (below). Filling the seams is careful work, time-consuming but also highly rewarding. At this time of year it needs to be got at earlier or later in the day, as the sun is simply too strong otherwise and hurries the mortar relentlessly. When mortar sets up too fast, it doesn't achieve optimal strength. I employ a hand mister to help keep things moist during seam-filling, and I place a cover over newly mortared segments to keep direct sunlight off. 


First step mortared in as a continuation of the landing level


Second step roughly mortared in place, adjacent rockeries taking shape as well


Filling the seams with mortar, tooling them with tuck pointers.


Seams drying out, misted with sprayer to slow the process down in the harsh light


Extending the secondary pathway


As noted, I had some difficulty deciding whether it was to be two steps or three. The choice really was either a third step or a short section of pathway in place of a third step. I hemmed and hawed for a time, then decided to lay it out as a chunk of path just to see how that would look. The old alignment ran through a dip at this point, exaggerating the degree of challenge in accessing the main path. I decided to fill the dip with base material, and that step suggested that a short section of path might be in fact be the way to go. So I thought I'd test that proposition with a fairly quick layout, pictured below.
 

An initial rough layout of a stub path, just to see whether this was a good approach to take


Revised layout on the old beaten path, base course of stone under it, inadvertently phallic!


This was happening in early autumn, an ideal time for path-making: warm enough to be pleasant working outside in shorts, not so hot as to make it an ordeal in direct sun. These conditions are optimal for the sort of playing around with layouts that can reveal fresh possibilities. Despite this being a narrower width than the main stem of the path, I wanted it to feel substantial. I had some chunkier pieces of stone left, so I decided to use them to define the edges despite the fact this would rather crowd the central channel. The larger material would add needed heft to the edges of the path, which would be more exposed here than elsewhere. And I was determined to work with what I had on hand, rather than cause delay while I went off to collect more stone.


I decided to work with the stone on hand, so wound up with this form as a result


Path looks quite Japanesque at this point, voids emphasizing solids


Setting the stones in place with mortar is a fun part of the process. Depending on how thin a piece is, you may need to build a little cribbing under it so it sits on a supported base (photo below). Then you mortar in the missing bits and voila, paving emerges!


Paving eventually emerges after a lot of adjustments, splendidly non-conjectural at this point


Just finished, still damp as the mortar sets up, tooled and looking quite smart


When a process has gone on for several years (done mostly in spare time, in a leisurely manner, weather permitting) one gets rather attached to the work and watching its slow progression towards an outcome. When it finally ends and the job is apparently complete, there ensue contradictory feelings of satisfaction and, perversely, a longing for more. In the end, the job isn't fully over, because there is a lot of finishing work on the adjoining beds and edges. And, of course, there are other paving jobs calling for attention elsewhere in the garden. But none as prominent as this one, and consequently none with as much riding on the outcome. Today I still find the results of that long process intensely satisfying, as the path now feels like a permanent part of the garden environment here. It is both a strength and a weakness that sandstone is open enough in grain to age and weather quite quickly. On the plus side, this makes it feel not-new in a short while, in turn helping it to feel like it belongs where it sits, indeed that it may really always have been there. This sense of 'fitness' contributes to an overall feeling of repose that we are anxious to capture for the gardens surrounding our house. And of course, this entry pathway structures your perceptions of those gardened spaces, drawing you into them and carrying you through some engaging scenery. Below, a few last shots of the front path as its life continues to evolve and change through the years.


Trimming spring growth back in 2016: maintenance is now job one


Still life with oak leaves, fall berries, lichen and moss


Wearing in now, white mortar softening with nature's dyes


Rain always emphasizes the channel-like quality of the path


Afternoon light on New Year's day, 2018, after a light shrub pruning


Woodland path glimpsed in springtime