Repaving paradise
 |
| In January 2015, on a wet and slightly misty winter's day |
 |
| Original asphalt walkway in summer 1988, serviceable enough then for continued use |
The job was unavoidable in the end, though I succeeded in putting off the day of reckoning for a long while. Partly my delaying came down to simply not knowing how to go about replacing the old walkway pictured above: asphalt to stone was a certainty in my mind, but which stone, from where, and how placed? Ultimately though that old front path had to go, its thin asphalt veneer wearing through in spots after many decades of use and weathering. And in fact it had been rather hastily made, probably at the time the original holding was subdivided, and without much attention to details. The puzzle was how to effect a change for the better, especially as the path would have to remain in continuous use for access to the front door. There was no option to switch to using the back door while the front walk was being replaced, so it would have to be done without taking it out of use. This dilemma stumped me for a long time. Then one day, after much canvassing of possibilities, I resolved to get started without having all the answers in hand. That day only came about because by then I had found what I felt would be suitable stone and assembled enough of it to be certain of remaking the entire path as a unified whole. Rendering the new path as a unity mattered because of the arts-and-crafts thinking governing design of the house, which had been contrived in intimate relation to its unique landscape setting. So it was essential that a new path integrate seamlessly with the existing ensemble of house and landscape, now over a century old. The path's overall alignment wasn't in question, only the materials and dimensions of the replacement surface and the process for getting it done. As it happened, an opportunity to collect sandstone in random chunks came along. These pieces were flat enough for paving and of fairly uniform thickness, foraged and stockpiled over several years at a family place on a nearby Gulf Island. The stone was pulled together from small openings (driveway cuts, building pads, etc) in the local landscape, supplemented by some quarry leftovers, collected over a couple of years.
 |
| Sampling of newly gathered material, just washed: irregular shapes, subtle colour variation |
 |
| Glistening with potential after washing, end of day, October 2009 |
When I finally had enough stone to be sure of completing the job, the only thing standing between me and tackling it full on was the fact I'd never built anything similar. I had built or repaired a number of stone steps that formed part of the pathway, and had made a circular stone patio (inset below) from a melange of paving materials. But here, by virtue of this being the entry pathway, a lot more was on the line. So, lacking a clear sense of
 how to set these irregular chunks of stone together to good effect, I felt I needed to gain some experience before tackling the big job. The fact was, this was the chance to create something that improved on the defects of the current paving - not least its baldly utilitarian quality. Asphalt is not, to my eye, a nice paving choice for an entry path, especially not one integral to a gardened environment. Asphalt does not contribute to a sense of place, nor offer a distinctive impression under foot. In its current state, the path enabled movement acceptably, just. As this path follows a rather elaborate alignment, taking visitors on a leisurely stroll past the building's facade before finally switching back towards the front door, I felt it merited loftier treatment. So the quality of the replacement paving mattered architecturally, to both landscape and dwelling, and to me personally, as I was determined to add some beauty to the utility of the existing alignment. I wanted the path to offer anyone transiting the space a sense of entry as memorable as the dwelling place itself. These aspirations set the bar fairly high, looking back on it now.
  | |
| Pulling suitable smaller chunks from shot rock in a quarry, most of which isn't suited to paving |
 |
| Once collected, quarry muck needs to be washed off; here I'm capably assisted by my son Bryn |
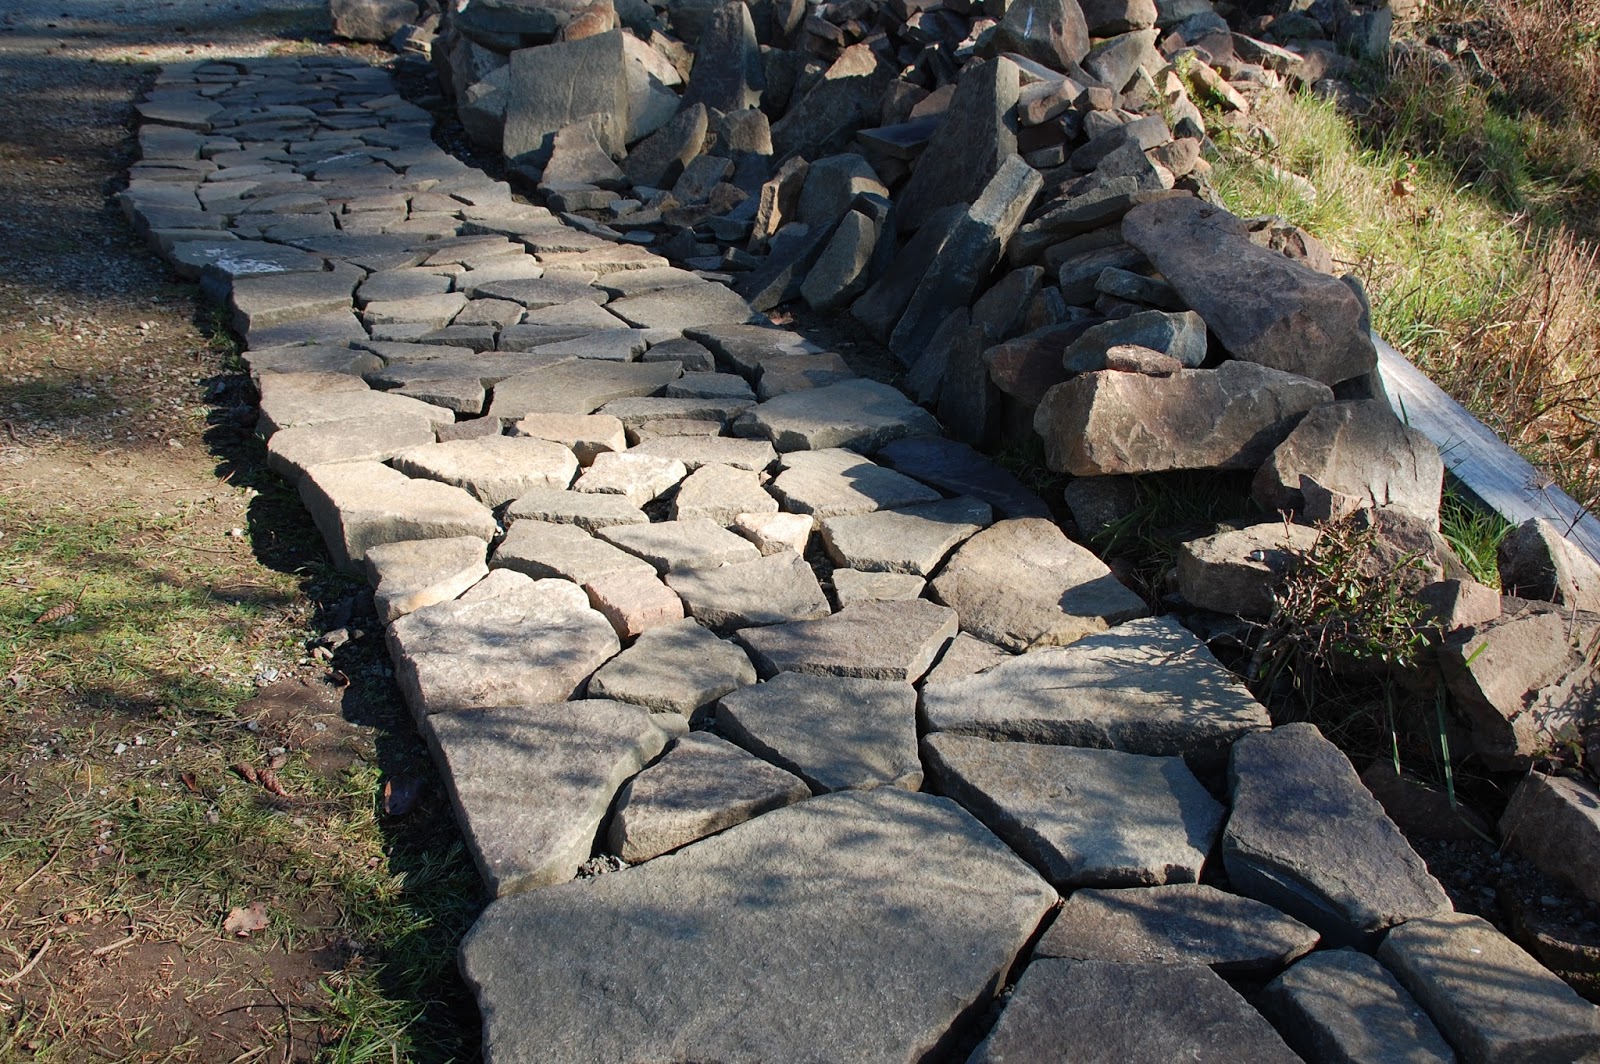
At this point I lacked confidence that I could actually work out a full design for the path in an evolving sequence on the land. Really, I had nothing to go by, no rules of thumb to guide layout and design, only my own determination not to screw it up. I'd learned a bit about setting flat stone from making the stone patio, but nothing about laying sandstone. So, having space available at the site where the stone was cached, I decided to practice by laying out a sample run of path, and set about doing this using a lightly graveled area as a makeshift base. This process allowed me to play around with placement with nothing riding on the outcome, and so to learn by doing and redoing. 'Play' was the operative term. I enjoyed getting to know the stone and I liked the results of this effort, and in fact looking back on it I still like the feel of that embryonic pathway and rather regret it was never built. Indeed I liked it enough that at the time I even toyed with transferring sections of it back to town, thinking I might be able to adapt what worked in one place to another locale. An attempt at doing this showed that literal transfer would be more difficult than imagined, and of course revealed that the segments weren't precisely sized for the width of the new path anyway. But I sure did enjoy the process of making a trial path and, as the following pictures show, I gleaned enough about putting fractured pieces of stone together to see how to achieve a fit: edges echoing adjacent edges as much as possible, ultimately generating a feeling of integration into a new whole. You can gauge my initial progress by the next few shots.


 |
| Figuring out how to place stones so they feel comfortable set alongside each other |
This experience went on over a number of weekends spaced out over some months. I continued experimenting, so began leveling up the stones with sand infill in order to make them appear more flush, a step that served to bring the overall look into sharper focus. This leveling process also magnified any gaps needing attention before finalizing a layout for cementing - gaps that weren't as apparent in rough layout. This in turn clarified to me that a distinct step towards tighter alignment would always be needed. I worked at refining my layouts for some time, distilling some insights as this process continued. I also began doing some research on approaches to path making that helped me sort things out. One perception this gave rise to was the value of using somewhat larger and chunkier pieces for the outer edges, a practice that gives a path heft and solidity. Looking at pictures of Japanese garden paths revealed patterns of using larger edge pieces to create the frame for a visually engaging flow of smaller pieces of stone, a relationship that simply felt right to my eye. This approach also led me to begin using small geometric chunks (triangles, squares, oblongs, etc) to infill residual voids and tighten up my layouts before setting. In doing this it became clear that laying the stones across the direction of the path (ie horizontally) slows the path's feeling of forward motion, resulting in a more relaxed composition. The converse is also true, and for my purposes was to be avoided (setting stones in the direction of the path speeds up the sense of forward movement, hurrying the eye along). More romancing of this experiment follows pictorially.
 |
| If you lay the pieces crosswise to the path's direction, the feeling of forward movement slows |
 |
| I got quite attached to this path after refining its layout and leveling it up |
 |
| Transfer of this layout to the front of the house seemed desirable, but quickly proved impossible! |
At this point I realized I just needed to haul enough of my stone to the actual site to begin the pathway on the ground, accepting it would not be laid out in its entirety all in one go. This seemed a big leap at the time, requiring me to take the risk of laying it out progressively in shorter segments, bringing each one to finished state before starting the next. I do like to see what I'm fashioning before setting it in cement, but knowing I had a supply of consistent materials allowed me to feel I could achieve a unified whole despite building it piecemeal. Sometimes you have to get out from under abstractions, which here involved adapting to the idea of tolerating the unknown for indefinite periods of time. So I began trucking stone to town, and at a certain point, I just dove in. Of course, some of the old path had to be knocked out first, which I did in phases in order to preserve access throughout layout and construction. I also excavated the existing underpinnings as needed, replacing coarse gravel and sand with compacted road base, in turn topped with a bed of three-eighths minus (aka 'crusher fines') as a prelude to starting layout.
 |
| First segment in rough layout, needing tightening and closer leveling before being mortared |
Once I'd taken the plunge there was no going back. Fortunately, life contrived to hand me a period of relatively greater disposable time. The photo above is the first of the inchoate pathway, in a rough initial layout. A sense of expectation grew as I placed those first stones and saw the jigsaw puzzle begin to emerge on the ground. This first phase lasted a while, as I had to formalize my approach to working with these materials. I quickly realized that daily comings and goings over pavers set loosely on a bed of crusher fines are an effective way to pre-load the base in preparation for eventual mortaring-in. Once I had brought the first section to a point where I was satisfied with the layout, the next challenge was to develop a way of keeping the path operational while setting the stones in mortar. This I did by working on one-half its width at a time, barriering that portion off so the mortar could set and harden. Fortunately, my family is patient with my slow-motion paving efforts, so was willing to put up with inconvenience while I figured out how to make progress. Effectively there was no other choice.
 |
| Spring shows progress and a foretaste of how it will look finished up |
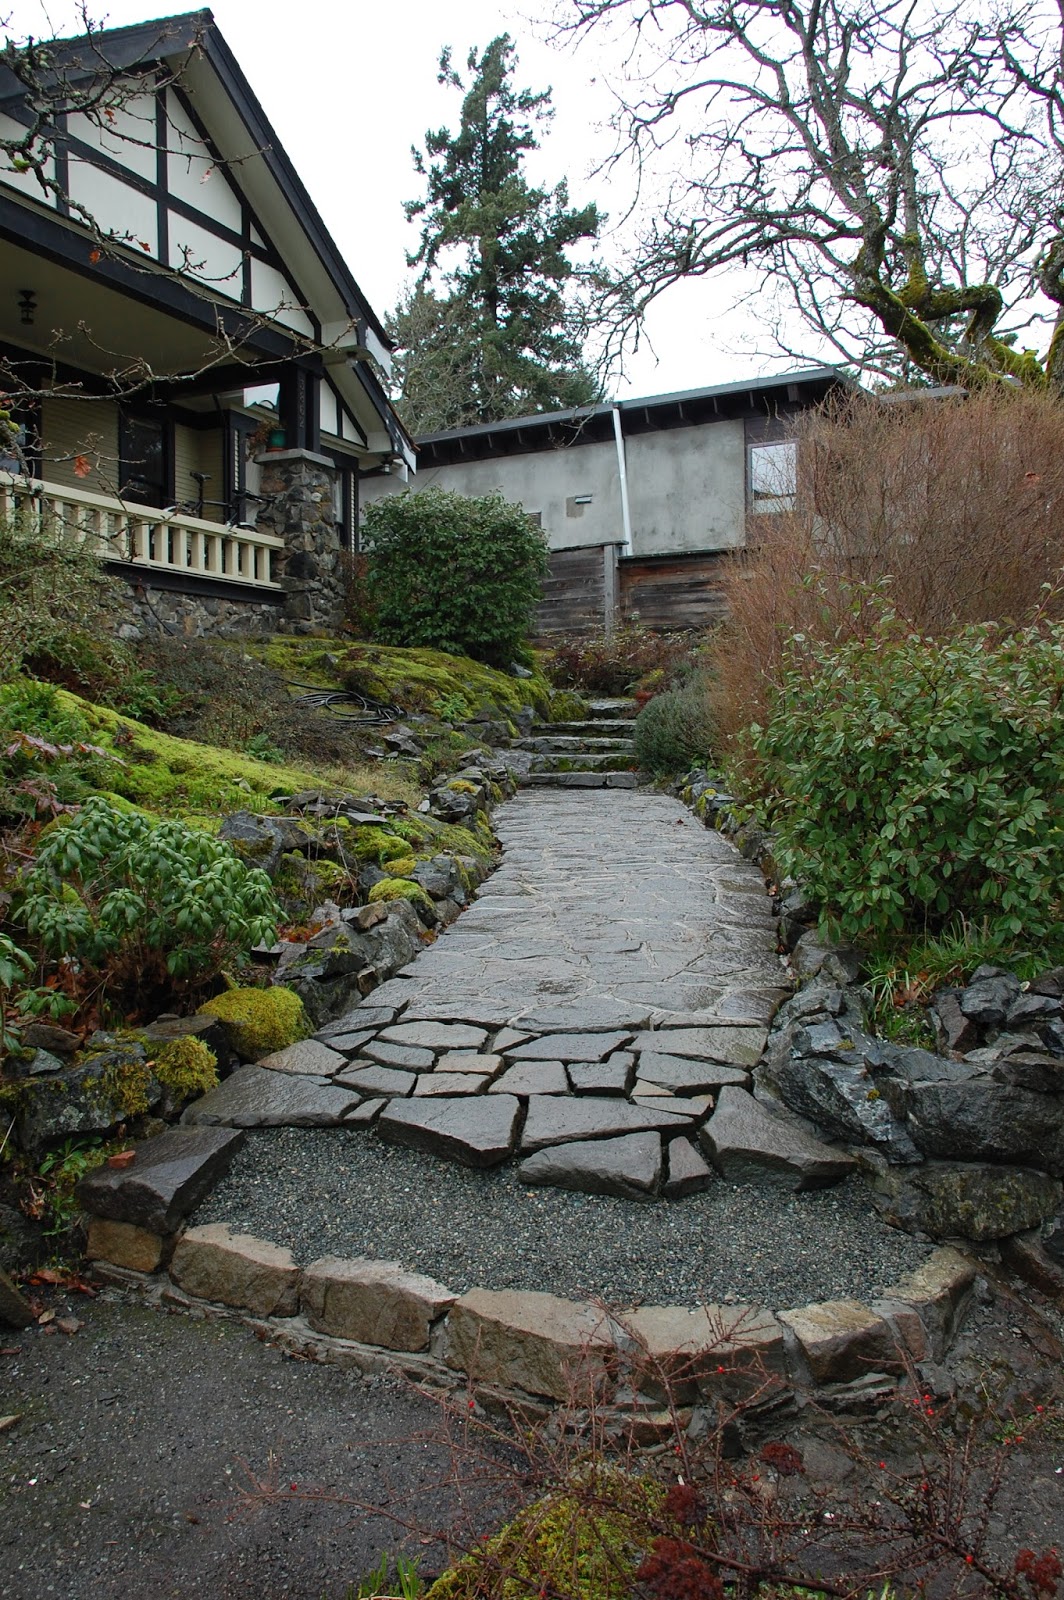
Considerations of utility also entered into the shaping of this new path. While the alignment was settled, the path needed to be wider than the past design, which pinched unacceptably at points. My goal was to make it wide enough for two people to pass comfortably, which is fitting on a main path and necessary for the moving of goods and appliances, some of which are quite bulky and all of which have to enter through the front door. As the path makes its way past the rock outcrops the house sits on, the
 land rises towards the house (see inset), while leveling out into a narrow bench on the other side of the path. Retention for the existing path had been awkwardly handled on the house side, which I judged needed rebuilding in a lower and more horizontal profile. And I was coming to feel that a degree of symmetry in these banks would be desirable, which meant securing enough of the appropriate material to edge both sides uniformly. I opted to use rock collected on site for the edgings, thereby continuing a past choice while supplementing my supplies with material foraged from a nearby highway cut. All of this local metamorphic rock would contrast nicely with the softer and warmer sandstone used for the paving.
 There was also a broader aesthetic concept forming in the back of my mind as the path began taking shape on the ground, involving the analogy of a stream-like flow across a hillside. Stone paths readily develop feelings of movement or flow, so I became curious to see if impressions of path-as-stream could be conjured and amplified in the disposition of stones. I knew I wanted to lessen the slope on the main run somewhat, which meant introducing a heightened step at the bottom end to soften out the gradient. This background idea of hinting at stream-like motion proved a fruitful metaphor as the path grew in extent, affecting both the ultimate placement of the new step and the dynamic shape its lip would assume to symbolize directional flow. But where the enabling step should be placed, how it should capture the feeling of stream moving as a body downhill, remained to be worked out. The base of the step would also become the point at which the main path divided into two distinct channels, one major in continuation of the path towards parking and the street, one lesser to accommodate a junction with an informal path from another part of the garden. In my estimation, the main path needed to project its flowing motion further downhill than the current configuration, whose actual purpose (step or retention) seemed unclear (see below).
 |
| An existing half-step appears directly behind the roughed-in new step, but would need removal! |
 |
| Initially I wanted to keep the old step for retention, but it would have pushed the path too high |
I initially thought I wanted to keep the existing step as retention for the base under the new path. But after trying this on (above) it became clear that the old makeshift had to come out and that a new step would need to be elevated on its own base course. The land begins to fall away more sharply through this section, so a distinct step up was desirable for both accessibility and to reinforce the impression of a stream. Best of all, my initial effort at layout without a base turned out not to be wasted at all, as it enabled me to arrive at a dynamic flow-form for the top-tier stones. And, having that top course in design allowed me to know exactly where to place a base course under it! The next pictures show this new layout evolving.
 |
| Old half-step knocked out, new base just mortared in place, echoing the proposed top course flow |
 |
| Viewed from above, illustrating how the corner could be turned on the left, again capturing flow |
A great deal of playing about went into this phase of the work. The layout needed to flow freely while feeling closely built-in at this point too, so plenty of tightening and refining went on before anything was set in mortar. Once the base course was in place, I could backfill the crib with fines and raise the actual path to working grade. The step base incorporates an intriguing curve (seen from above, it's flowing outwards in a dynamic bulge) that to me visually implies forward movement, spilling around the rockery edge (at right, below).
 |
| Base for retention, now filled with crusher fines awaiting surfacing |
I'd gotten caught up in working out a shape for a bed adjacent to the path while making the pathway proper. In effect, the two helped design each other, as one strand of the path would curl round the new bed edge and head off in a novel direction. You can see that bed evolving to the right of the path in the pictures above and below. Rounded at the nose of the rockery, this would cause the path to flow around it to generate an ancillary path running off the main one. I really enjoyed the process of knitting these elements together in design, and then finally fixing them in place with mortar.
 |
| Nearly ready for fixing in place, the step's form accommodates a secondary path branching off |
By this point the sequence of tasks leading to finished path had become formalized in my practice: first, lay down base materials, then rough-in initial layout, then tighten spacing and placement (including some reworking of the stone to smooth out ragged edges), then mortar stones in place, followed finally by filling and tooling of seams using tuck pointers. If the chunks of stone are thick enough, they can be set directly in cement; if thinner, they may need to have a base of cement and smaller stones for a foundation. Each of these phases absorbs time, the more so as I approach the work almost meditatively, which affords access to a working space (sometimes called 'flow') in which really good outcomes have room to develop. All this means really is that one's mind is entirely engaged in the process at hand - you get lost in the work and become one with it.
"When you find your place where you are, practice occurs" Dogen
I enjoy getting to the point where stones are finally set in place but the seams between them are not yet filled - arguably this is a path's most zen-like moment, because the voids between stones echo the solids and the resulting impression is graphic. Despite their appeal, the voids are filled with mortar because this ultimately simplifies the ongoing maintenance of the path. In our environment, any trough left open fills rapidly with organic material, which readily becomes soil supporting organic life (most commonly, moss). It is tremendously time-consuming to keep such troughs clear of material, which may be alright if you have staff to maintain your infrastructure! Filling the seams with mortar slows this process down, although it does not check it fully and eventually moss does need to be reckoned with. Mortared seams also serve to increase the grip of the path under foot. And, I think they do reinforce the blended, or in Japanese terms the 'gyo', quality of the result, emphasizing unity of ensemble over the individual pieces comprising it. In an English landscape lexicon, designs tend to be classed as either formal or informal, but in the Japanese idiom there is this middle term ('gyo') for designs that seek to blend both formal and informal characteristics. A path that is 'gyo' by design uses informal materials (random shapes of broken field stone or bedrock) to create an ensemble that in turn exhibits a degree of formality. Hence the term stone carpet (or 'nobedan') to describe this sort of mixed but unified path.
 |
| Layout now committed, mortaring stones in position, to be followed by seam filling and tooling |
Eventually even an approach as slow as this renders a relatively complete product, and the path maker can draw satisfaction from the outcome and feel pride in having actually bulled the work through. I am definitely having those feelings in the picture below, despite my work having really just begun. In fact, this is phase one of the four phases that will ultimately see us to a finished pathway. But here I am enjoying the fact that my notion of a stream appears to have borne fruit, confirmed in the way the step curves dynamically around the bank, drops suddenly like a falls, then spreads out onto a delta (yet to be constructed). At this point I have a growing sense of expectation about where all this is going!

Inventing a new landing
Because I work more adaptively than prescriptively, by eye say rather than by measure, I discover things en route that are knock-on consequences of previous decisions. So when I decided to introduce a raised step in order to lessen the incline of the main run of path, in effect I was also deciding to introduce a raised landing between the steps up from the parking pad and the main run of path. The fact the landing needed raising as a step wasn't fully evident to me until I began its construction, which takes shape in the area directly under my boots in the photo above. Once again, engineering this step up to the landing from the flight of steps from below will serve to level that run, in contrast to the asphalt path which rose up fairly sharply here. Being quite taken with the first phase of path-making, I had ready energy for getting on with what came next. Job one was to excavate the asphalt and even out the landing's current incline. I began closest to the steps leading up from the parking pad, hoping to be able to build right over part of the asphalt - but once again, this was not going to work out.
 |
| First, remove asphalt behind the step, excavate, then add compacted base material to build on |
I recall this moment in time quite vividly because by now I was totally inside the job and enjoying a certain exuberance. It's a great mental space to occupy: creativity feels like it can just flow on, undaunted by fresh challenges. I felt growing confidence that I could coax the next piece of path into a shape that would harmonize with the segment preceding it. And, I had real appetite for more of this form of self-expression, so I was now approaching the work with a serious wind to my back.
 |
| Quick first go at a complex layout, to gain a sense of what it will look like |
 |
| Defining the height of the raised landing, seeking a gentler slope up to the main path |
The landing was laid out substantially in springtime and mortared in during the summer and fall of 2012. I savoured this part of the project, working at lessening the path's downward trajectory through the landing, in a sequence of pleasurable, trance-like bouts of personal creativity. Ultimately it became clear that the remaining asphalt had to be knocked out so the grade down from the waterfall-step could be lessened as it moved through the landing.
 |
| Still trying to avoid knocking the old base out, but the slope is too steep |
 |
| Bullet bitten: asphalt be gone, excavate and replace the base |
 |
| Layout redone, this time in a gentler, flowing gradient, now ready for mortaring in |
 |
| Seen from above, close to finished version |
 |
| Closing in on completeness, a couple more presentation stones still to be fixed in place |
By spring of 2013, the landing is fully functional and I'm preparing myself to tackle the next piece of the puzzle. Our house is slated to be on Saanich's fall heritage tour in this its centennial year, so it is important to get the work to a point of greater completeness. This next section posed some unique challenges and so had an engaging complexity to it from the start, but prior successes led to confidence that really any obstacle could be surmounted. As the old zen saying infers ('the obstacle is the path'), resolving the obstacles was in fact the way of defining the path.
 |
| Looking smart, if terribly new, the main stem of the path is in hand |
Fashioning a pair of distinctive steps
You can see how the path splits into two distinct channels at the main step, as if flowing on either side of the bed that's defining itself in the foreground (photo above). To me, the analogy of captured motion is graphic here, imparting mystery and interest to the emerging walkway. I am taking care to also reinforce connection to the building's arts-and-crafts motifs by striving for as much of a built-in feeling as possible (the house itself comes with many built-in components, such as window seats, and its form has been gracefully inserted into the landscape). Most principal walkways in modern

After finishing up the landing, the next challenge was to tie the main trunk into a more minor path that was currently a narrow beaten track winding up from the road through a wooded area of the garden. The existing alignment was totally informal, a trail through a woodland that possessed a certain charm. However, nearing the main path the land rises sharply over some exposed bedrock, which meant the existing configuration charged up an incline fairly abruptly. This was not always easy to navigate, so the thought here was to replace the sharp rise with at least two, and possibly three, secure steps, which would reduce risk and extend utility by facilitating a more convenient access from below. One issue to resolve was scaling the new steps to sit well aesthetically with the main path while fitting them comfortably into the land form.
 |
| First attempt to rough-in step edges, after settling a base into place |
 |
| Complexities abound: bed edges to be formed on either side, landing to continue into first step |
There were lots of considerations in finding a design for this segment of path. One decision was to continue the landing around the bed's edge and directly into the top step (above). This would enable moving a wheel barrow through the landing level without having to step it up and down to the main path's level. But the steps really needed to look 'right' for the site, so be neatly fitted-in between two beds that were evolving in tandem with it. There was a lot of feeling-my-way through this piece of the work in order to resolve things like how deep to make the steps. This is where a willingness to play around with prospective layouts really comes in handy. Once you commit to mortaring stones in place, they are well and truly fixed there (becoming the new datum, as it were) - so I want to be sure it's going to work, aesthetically and utility-wise, before committing to a layout.
 |
| Top step deepening, developing proportion consistent with the rest of the pathway |
 |
| Proportioning continues, the top stop deepening, third step now an open question in my mind |
 |
| Two steps firmed up, top step mortared in, edges taking shape |
Introducing steps at this point had advantages, but at some point the newly built steps would need to transition to beaten woodland trail. Arriving at this layout would ultimately become phase four of the project, but the question of how and where to make the transition was still open at this point. A chief concern was to make the steps generous enough to feel secure under foot, as goods were often trundled up this way from a solo parking spot at the road edge, and also to design them to better accommodate advancing age and diminishing balance on the residents' part. And I obviously hoped for an overall consistency and visual balance with the main path and landing, while still giving the steps their own distinctive presence. You need your head in the right space to get the most out of this sort of process, where things are co-defining. The return of spring certainly inspires you to get out there and do it.
 |
| Spring returns and the opportunities for continued stone work expand |
By May and on into June, things were shaping up nicely. The next pictures show the steps laid out and being mortared in, then their seams being filled and tooled. I find setting the shape of a step to be supremely satisfying - you see the form first appear with voids between the pieces emphasized, which dramatizes the forms (below). Filling the seams is careful work, time-consuming but also highly rewarding. At this time of year it needs to be got at earlier or later in the day, as the sun is simply too strong otherwise and hurries the mortar relentlessly. When mortar sets up too fast, it doesn't achieve optimal strength. I employ a hand mister to help keep things moist during seam-filling, and I place a cover over newly mortared segments to keep direct sunlight off.
 |
| First step mortared in as a continuation of the landing level |
 |
| Second step roughly mortared in place, adjacent rockeries taking shape as well |
 |
| Filling the seams with mortar, tooling them with tuck pointers. |
 |
| Seams drying out, misted with sprayer to slow the process down in the harsh light |
Extending the secondary pathway
As noted, I had some difficulty deciding whether it was to be two steps or three. The choice really was either a third step or a short section of pathway in place of a third step. I hemmed and hawed for a time, then decided to lay it out as a chunk of path just to see how that would look. The old alignment ran through a dip at this point, exaggerating the degree of challenge in accessing the main path. I decided to fill the dip with base material, and that step suggested that a short section of path might be in fact be the way to go. So I thought I'd test that proposition with a fairly quick layout, pictured below.
 |
| An initial rough layout of a stub path, just to see whether this was a good approach to take |
 |
| Revised layout on the old beaten path, base course of stone under it, inadvertently phallic! |
This was happening in early autumn, an ideal time for path-making: warm enough to be pleasant working outside in shorts, not so hot as to make it an ordeal in direct sun. These conditions are optimal for the sort of playing around with layouts that can reveal fresh possibilities. Despite this being a narrower width than the main stem of the path, I wanted it to feel substantial. I had some chunkier pieces of stone left, so I decided to use them to define the edges despite the fact this would rather crowd the central channel. The larger material would add needed heft to the edges of the path, which would be more exposed here than elsewhere. And I was determined to work with what I had on hand, rather than cause delay while I went off to collect more stone.
 |
| I decided to work with the stone on hand, so wound up with this form as a result |
 |
| Path looks quite Japanesque at this point, voids emphasizing solids |
Setting the stones in place with mortar is a fun part of the process. Depending on how thin a piece is, you may need to build a little cribbing under it so it sits on a supported base (photo below). Then you mortar in the missing bits and voila, paving emerges!

 |
| Paving eventually emerges after a lot of adjustments, splendidly non-conjectural at this point |
 |
| Just finished, still damp as the mortar sets up, tooled and looking quite smart |
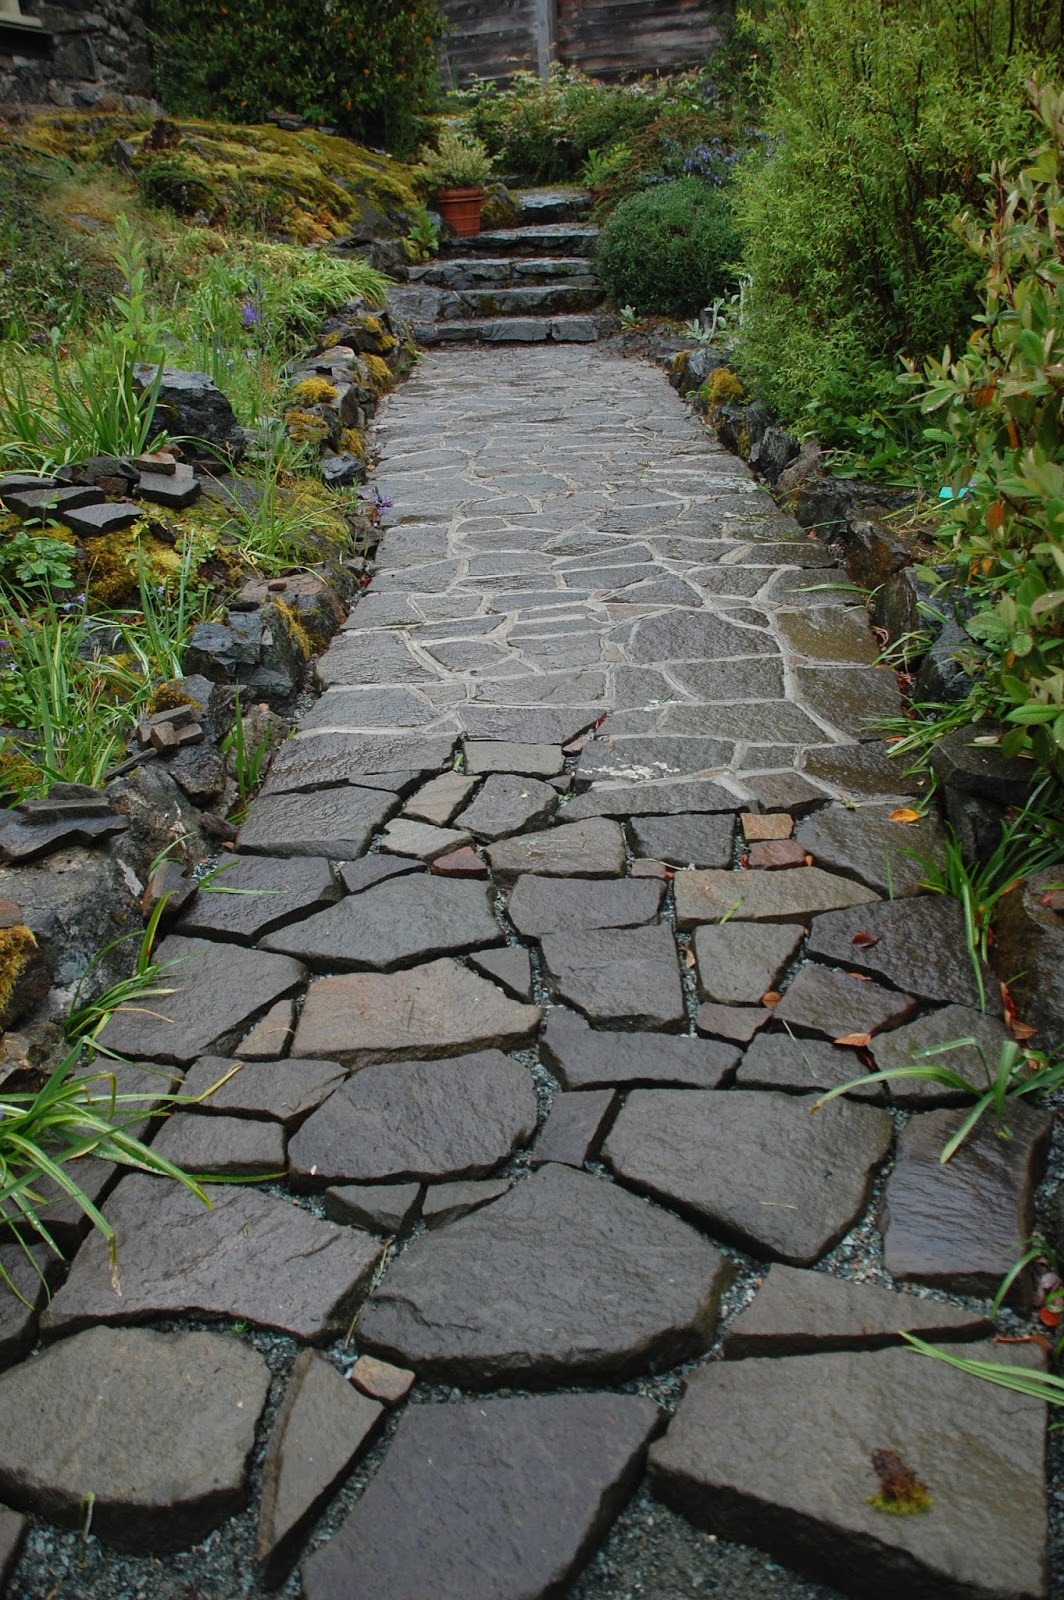
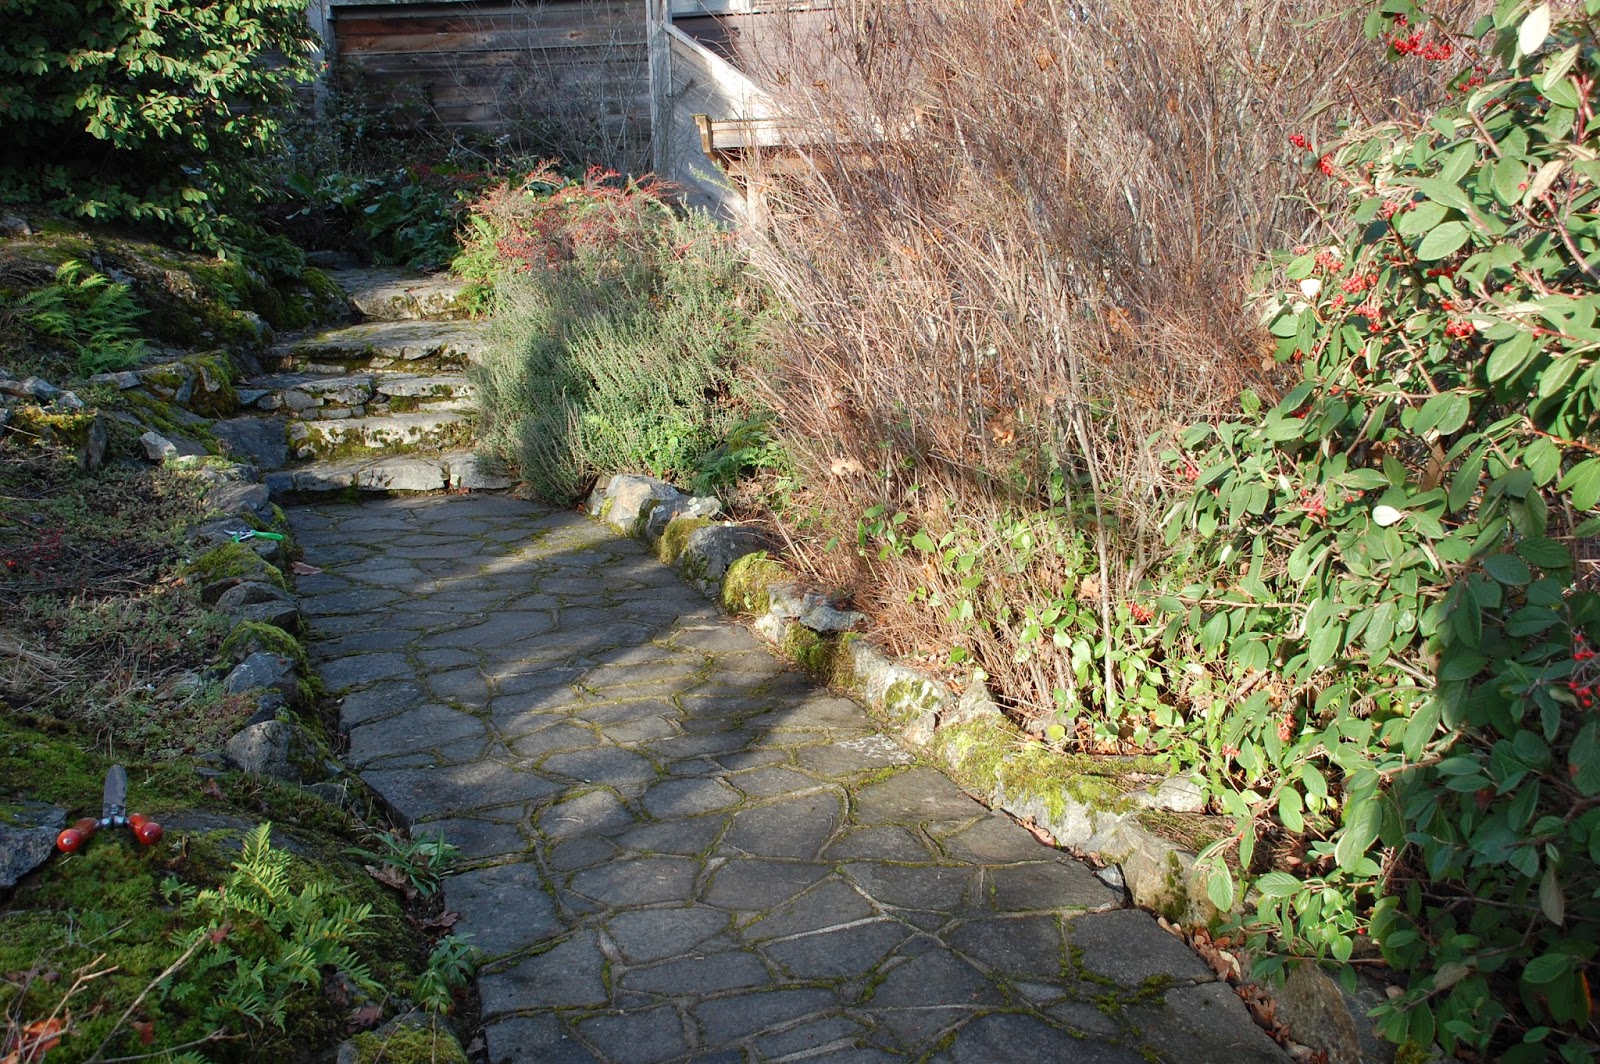
When a process has gone on for several years (done mostly in spare time, in a leisurely manner, weather permitting) one gets rather attached to the work and watching its slow progression towards an outcome. When it finally ends and the job is apparently complete, there ensue contradictory feelings of satisfaction and, perversely, a longing for more. In the end, the job isn't fully over, because there is a lot of finishing work on the adjoining beds and edges. And, of course, there are other paving jobs calling for attention elsewhere in the garden. But none as prominent as this one, and consequently none with as much riding on the outcome. Today I still find the results of that long process intensely satisfying, as the path now feels like a permanent part of the garden environment here. It is both a strength and a weakness that sandstone is open enough in grain to age and weather quite quickly. On the plus side, this makes it feel not-new in a short while, in turn helping it to feel like it belongs where it sits, indeed that it may really always have been there. This sense of 'fitness' contributes to an overall feeling of repose that we are anxious to capture for the gardens surrounding our house. And of course, this entry pathway structures your perceptions of those gardened spaces, drawing you into them and carrying you through some engaging scenery. Below, a few last shots of the front path as its life continues to evolve and change through the years.
 |
| Trimming spring growth back in 2016: maintenance is now job one |
 |
| Still life with oak leaves, fall berries, lichen and moss |
 |
| Wearing in now, white mortar softening with nature's dyes |
 |
| Rain always emphasizes the channel-like quality of the path |
 |
| Afternoon light on New Year's day, 2018, after a light shrub pruning |
 |
| Woodland path glimpsed in springtime |